How to draw selections for buildings: Difference between revisions
Jump to navigation
Jump to search
Created page with ": ''Now the building can be drawn into the 3D world by selecting the 'Draw Area' button on the bottom of the panel. A new panel - the Brush Panel - becomes available under the editor main view port:'' <gallery mode="nolines"> File:ConstructionDrawAreaRightSideDetail-Q3-2015.jpg|Draw Area Button File:ConstructionBrushPanelRightSideDetail-Q3-2015.jpg|Brush Panel File:construction19.jpg|Brush Panel Area Selection </gallery> : ''By dragging the cursor, while left click..." |
No edit summary |
||
| Line 1: | Line 1: | ||
{{Editor steps|title=change buildings|Select Buildings from Current Situation|Search in the list or the 3D world for the building to be changed|Select the name or building.|On the detail panel on the right side, change the building name in the "[[#Name|Name]]" field|Select the [[#Function (Building Type)|building type]] by clicking on the image|Select if a building is vacant, by marking the check box named "[[#Vacancy|Vacant]]"|Select the building owner from the drop down menu|Use the entry field in the Section selection to set the "[[#Amount of floors|Amount of floors]]"|Select to use the default roof/ wall colors or to use custom colors (check box & color menu)|Select the "[[#Draw area|Draw]]" Button to draw the building in in the 3D world}} | |||
{{clear|left}} | |||
: ''Now the building can be drawn into the 3D world by selecting the 'Draw Area' button on the bottom of the panel. A new panel - the [[Brush]] Panel - becomes available under the editor main view port:'' | : ''Now the building can be drawn into the 3D world by selecting the 'Draw Area' button on the bottom of the panel. A new panel - the [[Brush]] Panel - becomes available under the editor main view port:'' | ||
Revision as of 07:56, 6 October 2022
How to change buildings:
- Select Buildings from Current Situation
- Search in the list or the 3D world for the building to be changed
- Select the name or building.
- On the detail panel on the right side, change the building name in the "Name" field
- Select the building type by clicking on the image
- Select if a building is vacant, by marking the check box named "Vacant"
- Select the building owner from the drop down menu
- Use the entry field in the Section selection to set the "Amount of floors"
- Select to use the default roof/ wall colors or to use custom colors (check box & color menu)
- Select the "Draw" Button to draw the building in in the 3D world
- Now the building can be drawn into the 3D world by selecting the 'Draw Area' button on the bottom of the panel. A new panel - the Brush Panel - becomes available under the editor main view port:
-
Draw Area Button
-
Brush Panel
-
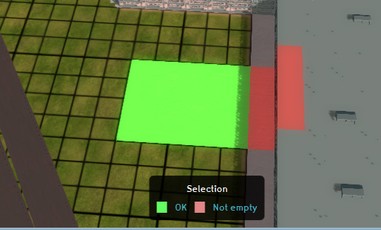
Brush Panel Area Selection
- By dragging the cursor, while left clicking on on the 3D world's main view, the ground plan for the building is drawn. Colors indicate if the area is available for the selected building. Different Selection Types can be selected; rectangles for buildings, lines for roads, etc. By selecting 'Apply Selection', the building is confirmed. 'Clear Selection' removes the selection from the 3D world. The option 'Remove Building' can be used to remove any buildings that are already in the 3D world present. This option only removes the actual drawn-in building, the building slot will remain in the list of buildings, as an empty slot.
