Basic skills tutorial: Difference between revisions
Redirected page to Basics tutorial Tag: New redirect |
|||
| (30 intermediate revisions by 5 users not shown) | |||
| Line 1: | Line 1: | ||
#REDIRECT [[basics tutorial]] | |||
This page offers a number of assignments that help you get acquinted with some of the basics of the Tygron Platform | |||
These assignments can be done in the | These assignments can be done in the [[Demo Basics Project]]. This project is available in all domains. | ||
===Starting the project=== | ===Starting the project=== | ||
After logging in, you will find yourself in the main menu. Select "Edit Project", and then select the | After logging in with the {{software|client}}, you will find yourself in the main menu. Select "Edit Project", and then select the [[Demo Basics Project]]. It will begin to load. When the editor has loaded, you will see an interface with a ribbon menu at the top, and the [[3D Visualization]] in the center. If you don't want to save the adjustments you make in these practice assignment, you are now ready to begin. However, if you do want to save all the adjustments you practice with these assignments you need to make a personal copy of the [[Demo Basics Project]]. | ||
{{Editor steps|preamble=Save your own practice project|Select "File" in the [[ribbon]].|Save As [[left panel]], adjust the name to a self chosen project name.|Select "Save".}} | {{Editor steps|preamble=Save your own practice project|Select "File" in the [[ribbon]].|Save As [[left panel]], adjust the name to a self chosen project name.|Select "Save".}} | ||
This new created project can be edited and saved whenever you want. You are now ready to begin these assignments. | This new created project can be edited and saved whenever you want. You are now ready to begin these assignments. | ||
| Line 13: | Line 13: | ||
These assignments will guide you step-by-step through some simple use-cases. | These assignments will guide you step-by-step through some simple use-cases. | ||
=== | ===Create a new user account=== | ||
[[File:User_aanmaken.png|thumb|right|Add a new user]] A | [[File:User_aanmaken.png|thumb|right|Add a new user]] A frequently asked question is how to create a new user in one's own domain. Notice, this action can only be performed by the domain admin. The domain admin is the person who is listed as the main contact person for Tygron. | ||
# Add a new user to the domain | # Add a new user to the domain | ||
| Line 20: | Line 20: | ||
# Provide the new user a password | # Provide the new user a password | ||
If you need more information to execute these assignments go to the specific wiki pages with the | If you need more information to execute these assignments go to the specific wiki pages with the in-depth information. | ||
# How to add a | # [[How to add a User]] | ||
===Adjust the | ===Adjust the project in the editor=== | ||
These two assignments are linked by a common question that is asked | These two assignments are linked by a common question that is asked often to the support team. ''I have drawn a building in the 3D Visualization and now it's gone. How is that possible?'' [[File:Remove_construction.jpg|thumb|right|Remove building]] Probably the answer is that you try to draw a building from the action menu instead of from the buildings. [[File:Build_Building.jpg|thumb|right|Place new building]] After completing the following two assignments, the difference is clear between drawing buildings and drawing an action that may be a building, for example. [[File:Floor_height.jpg|thumb|right|Adjust Floor height]] | ||
In this first assignment you will adjust the | In this first assignment you will adjust the project. After this practice you can edit your base project in case you need to change the project after loading a new project in the wizard. | ||
The assignment consists of three parts. | The assignment consists of three parts. | ||
# Remove a | # Remove a building in the project to create an empty spot where you can put a new building. | ||
# Add a new | # Add a new building of the category Education of the Education Luxury type. | ||
# Edit the new Education Luxury building to a building with | # Edit the new Education Luxury building to a building with 10 floors. | ||
If you need more information in order to execute these assignments go to the specific wiki pages with the | If you need more information in order to execute these assignments go to the specific wiki pages with the in-depth information. | ||
# [[ | # [[How to add and remove buildings]] | ||
# [[ | # [[How to edit building properties]] | ||
# [[ | # [[How to draw selections for buildings]] | ||
For more information on this topic, visit the following pages: | For more information on this topic, visit the following pages: | ||
* [[ | * [[Buildings]] | ||
===Adjust the | ===Adjust the project in a session=== | ||
In this assignment you will adjust the action menu. [[File:Action_.jpg|thumb|right|Building action in action menu]] After this practice you can edit the | In this second assignment you will adjust the action menu. [[File:Action_.jpg|thumb|right|Building action in action menu]] After this practice you can edit the project during a session or during a Testrun. | ||
The assignment consist of four parts. | The assignment consist of four parts. | ||
# Add a new action menu to the Uni Real Estate stakeholder and name it Leisure | # Add a new action menu to the Uni Real Estate stakeholder and name it Leisure | ||
# Add a build Sports | # Add a build Sports Centre option to the action menu | ||
# Build an Sports Centre building in the | # Build an Sports Centre building in the project | ||
# (Notice the test run has started) Stop the | # (Notice the test run has started) Stop the Testrun and notice the new build building disappears. | ||
If you need more information to execute these assignments go to the specific wiki pages with the | If you need more information to execute these assignments go to the specific wiki pages with the in depth information. | ||
# [[Actions#Adding_and_removing_action_menu.27s|How add | # [[Actions#Adding_and_removing_action_menu.27s|How add an action menu]] | ||
# [[Actions#Adding_and_removing_actions|How to add a | # [[Actions#Adding_and_removing_actions|How to add a building to the action menu]] | ||
# [[ | # [[Function|How to build a building]] | ||
# [[Test_Run|What is a Testrun]] | # [[Test_Run|What is a Testrun]] | ||
For more information on this topic, visit the following pages: | For more information on this topic, visit the following pages: | ||
* [[Actions]] | * [[Actions]] | ||
<br style='clear:both'> | <br style='clear:both'> | ||
===Loading in GeoJSON=== | ===Loading in GeoJSON=== | ||
In this assignment you will load in a [[GeoJSON]] file into the editor.[[File:Area_overlay.jpg|thumb|right|Area visible in overlay]] A file has been prepared with a | In this assignment you will load in a [[GeoJSON]] file into the editor.[[File:Area_overlay.jpg|thumb|right|Area visible in overlay]] A file has been prepared with a [[Water level area (Water Overlay)|water level area]] that can be imported in the [[Demo Basics Project]]. The file also contains (fictional) attribute values. By loading in this file into the editor, the new water level area is added with the attribute values as defined in the file. | ||
In preparation download the example area file | In preparation download the example area file. | ||
# Import the GeoJSON file as an area | # Import the GeoJSON file as an area | ||
| Line 100: | Line 70: | ||
If you need more information to execute these assignments go to the specific wiki pages with the indepth information. | If you need more information to execute these assignments go to the specific wiki pages with the indepth information. | ||
# How to [[GeoJSON#How to load a GeoJSON file into the | # How to [[GeoJSON#How to load a GeoJSON file into the {{software}}|add a GeoJSON file]] | ||
# How to [[Overlay#Adding and removing overlays|add an overlay]] | # How to [[Overlay#Adding and removing overlays|add an overlay]] | ||
For more information on this topic, visit the following pages: | For more information on this topic, visit the following pages: | ||
* [[GeoJSON]] | * [[GeoJSON]] | ||
* [[ | * [[Area]] | ||
* [[ | * [[Attribute]] | ||
* [[Overlay]] | * [[Overlay]] | ||
[[Category: tutorials]] | |||
Latest revision as of 09:27, 13 July 2023
Redirect to:
This page offers a number of assignments that help you get acquinted with some of the basics of the Tygron Platform
These assignments can be done in the Demo Basics Project. This project is available in all domains.
Starting the project
After logging in with the Tygron Client, you will find yourself in the main menu. Select "Edit Project", and then select the Demo Basics Project. It will begin to load. When the editor has loaded, you will see an interface with a ribbon menu at the top, and the 3D Visualization in the center. If you don't want to save the adjustments you make in these practice assignment, you are now ready to begin. However, if you do want to save all the adjustments you practice with these assignments you need to make a personal copy of the Demo Basics Project.
- Select "File" in the ribbon.
- Save As left panel, adjust the name to a self chosen project name.
- Select "Save".
This new created project can be edited and saved whenever you want. You are now ready to begin these assignments.
Guided Assignments
These assignments will guide you step-by-step through some simple use-cases.
Create a new user account
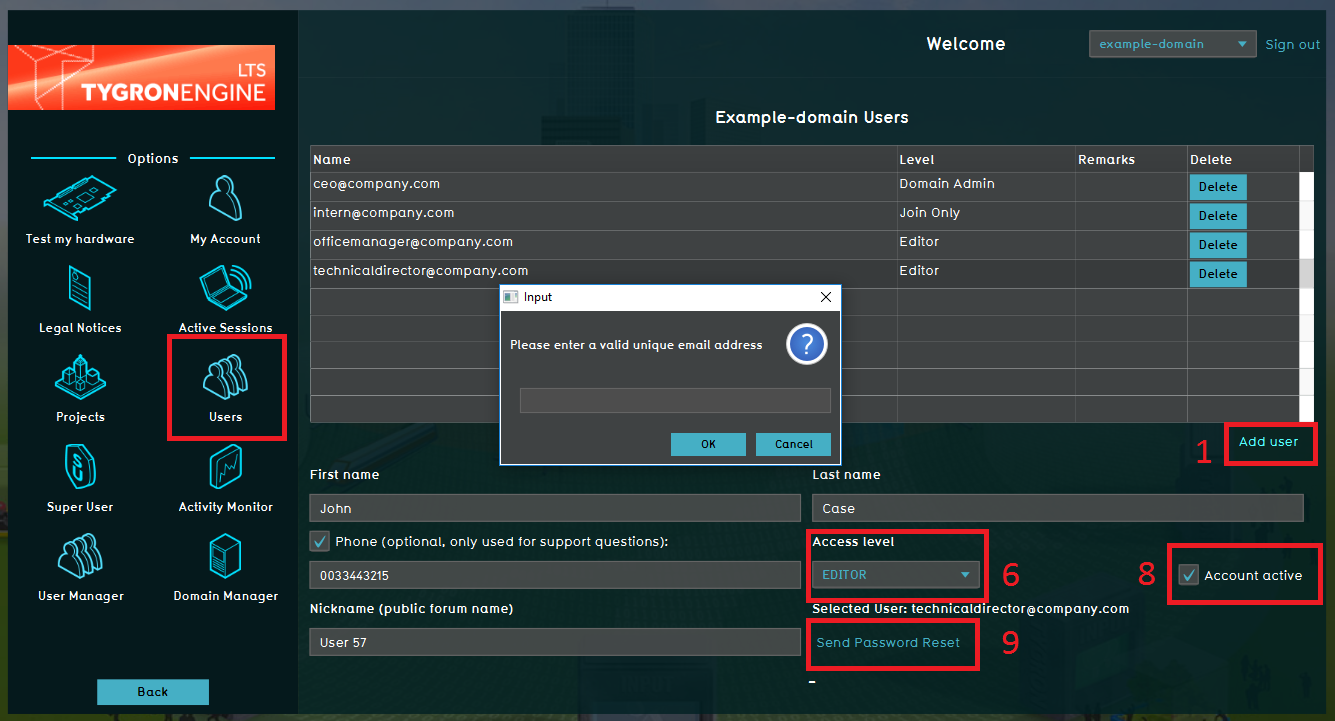
A frequently asked question is how to create a new user in one's own domain. Notice, this action can only be performed by the domain admin. The domain admin is the person who is listed as the main contact person for Tygron.
- Add a new user to the domain
- Adjust the rights for the new user to Editor
- Provide the new user a password
If you need more information to execute these assignments go to the specific wiki pages with the in-depth information.
Adjust the project in the editor
These two assignments are linked by a common question that is asked often to the support team. I have drawn a building in the 3D Visualization and now it's gone. How is that possible?
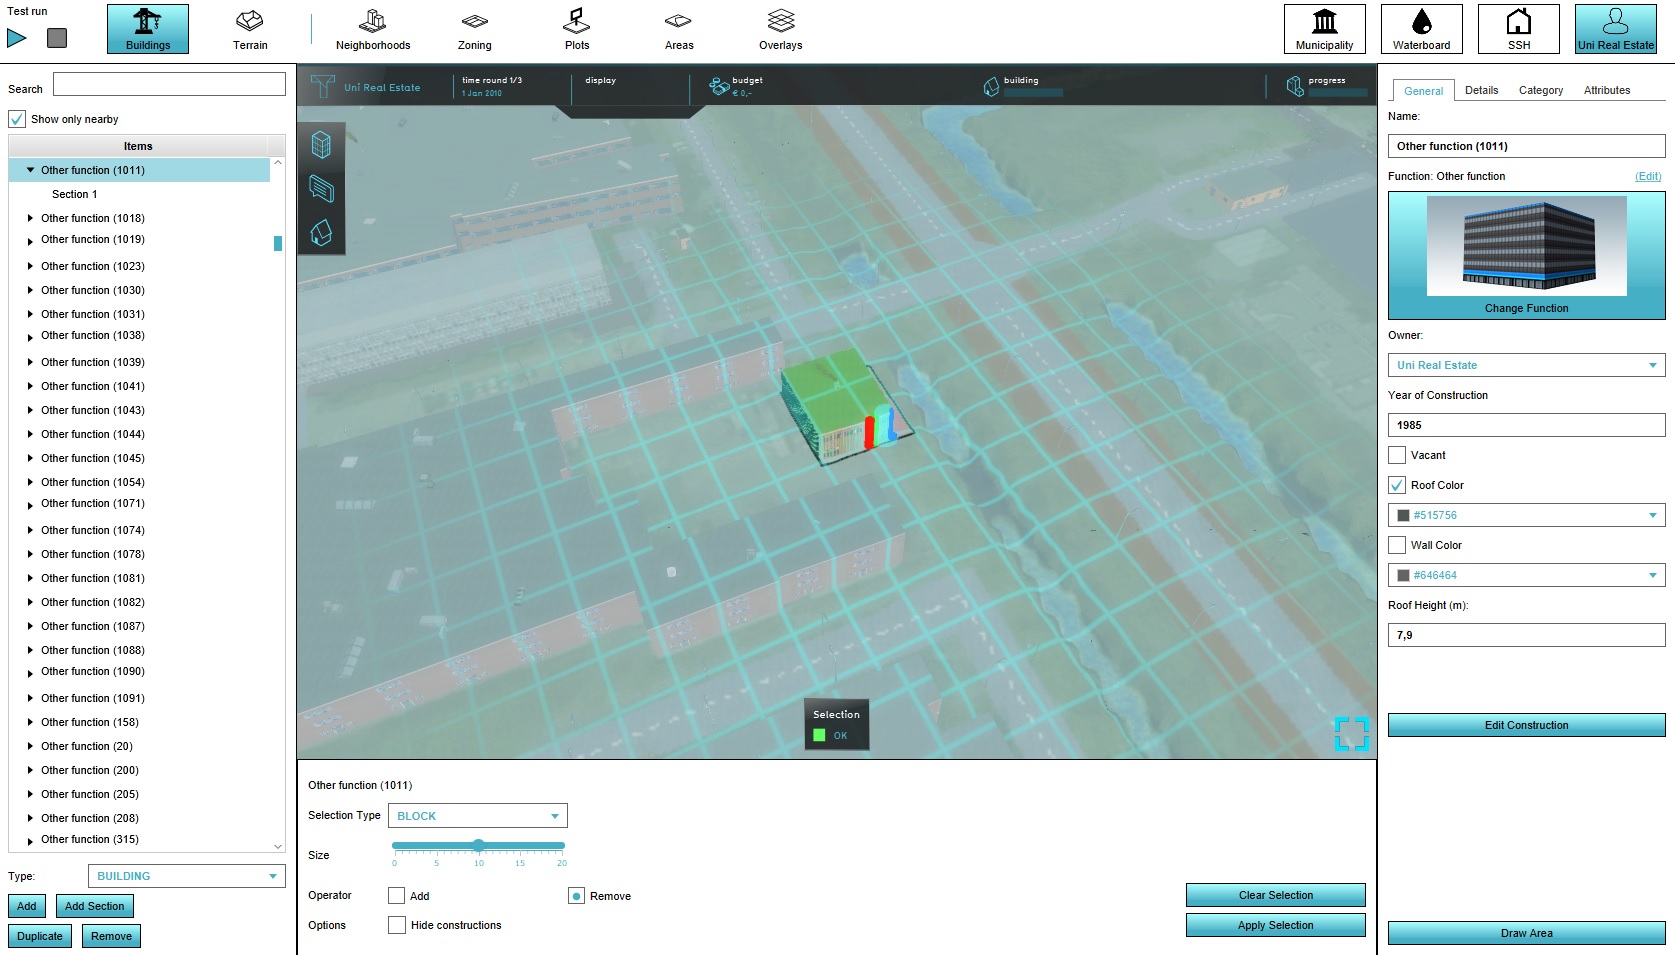
Probably the answer is that you try to draw a building from the action menu instead of from the buildings.
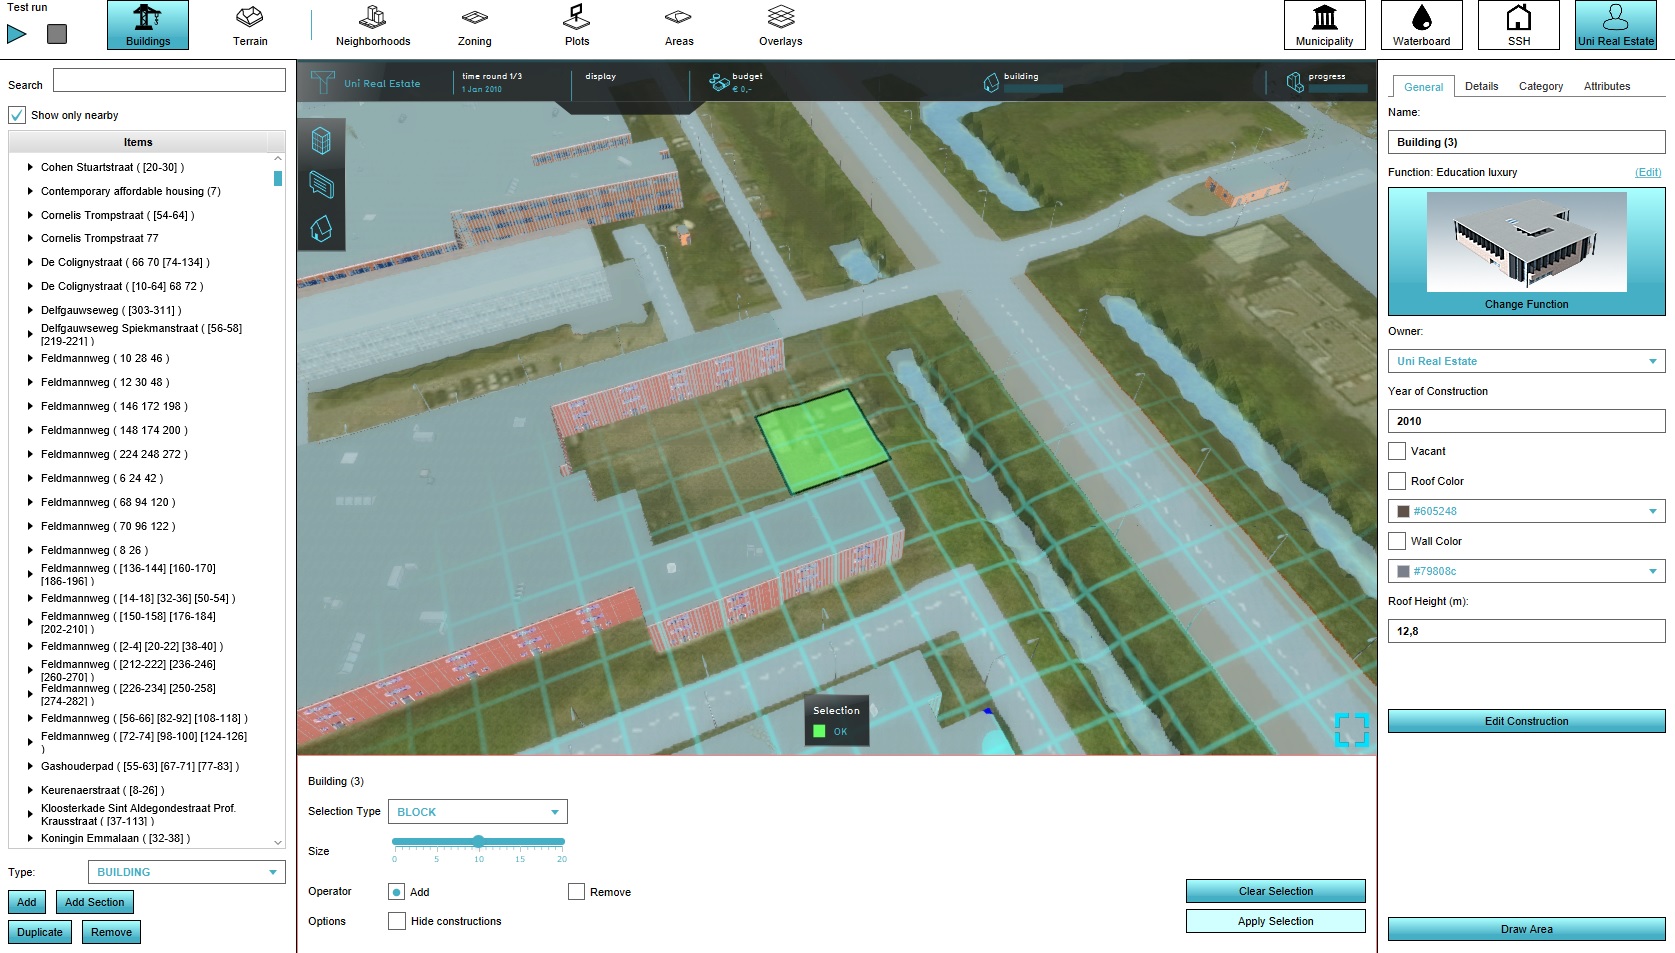
After completing the following two assignments, the difference is clear between drawing buildings and drawing an action that may be a building, for example.
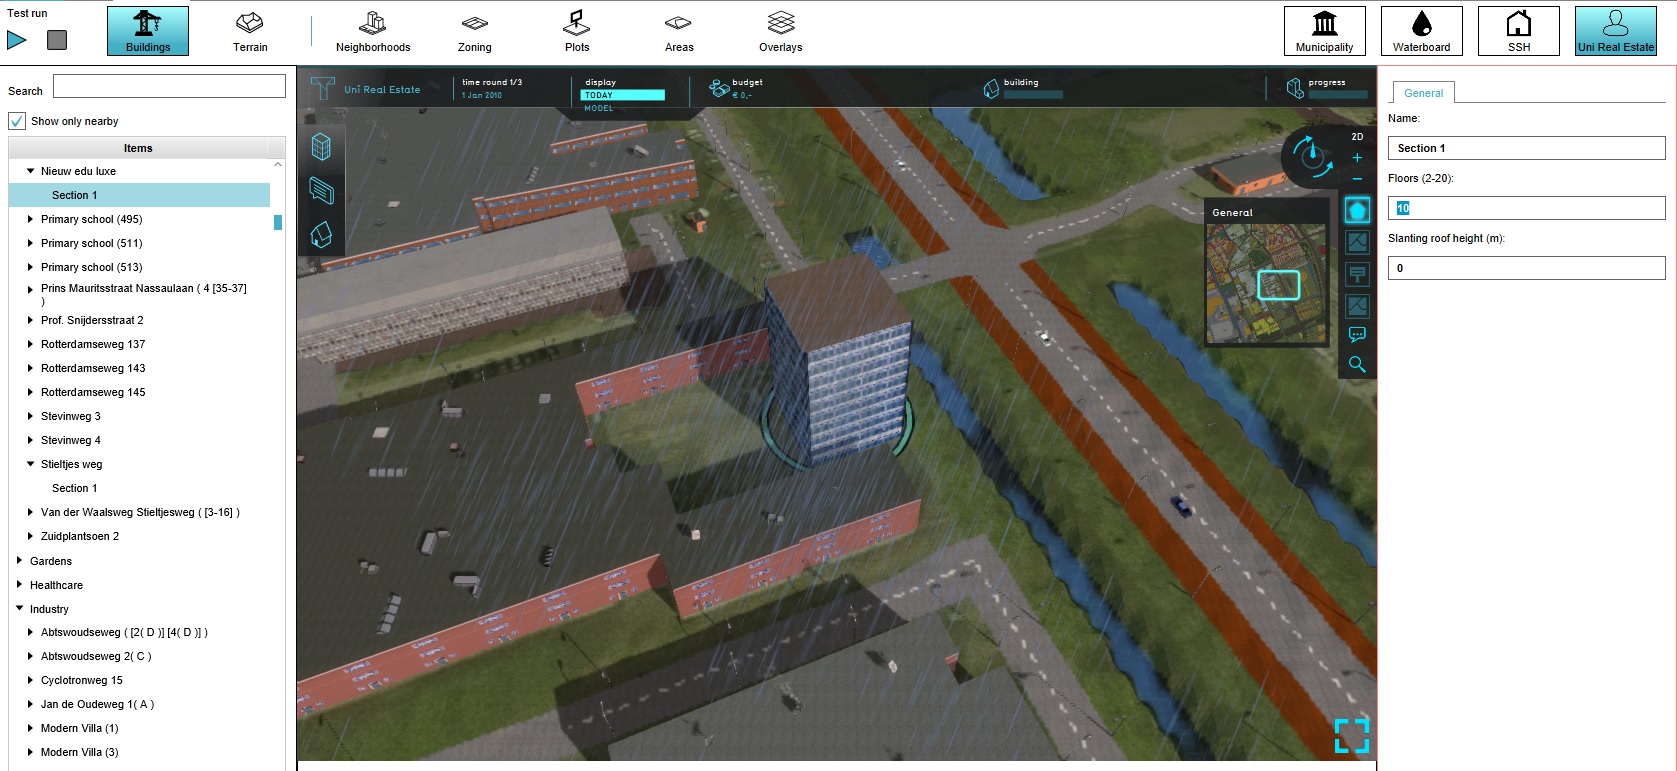
In this first assignment you will adjust the project. After this practice you can edit your base project in case you need to change the project after loading a new project in the wizard. The assignment consists of three parts.
- Remove a building in the project to create an empty spot where you can put a new building.
- Add a new building of the category Education of the Education Luxury type.
- Edit the new Education Luxury building to a building with 10 floors.
If you need more information in order to execute these assignments go to the specific wiki pages with the in-depth information.
- How to add and remove buildings
- How to edit building properties
- How to draw selections for buildings
For more information on this topic, visit the following pages:
Adjust the project in a session
In this second assignment you will adjust the action menu.
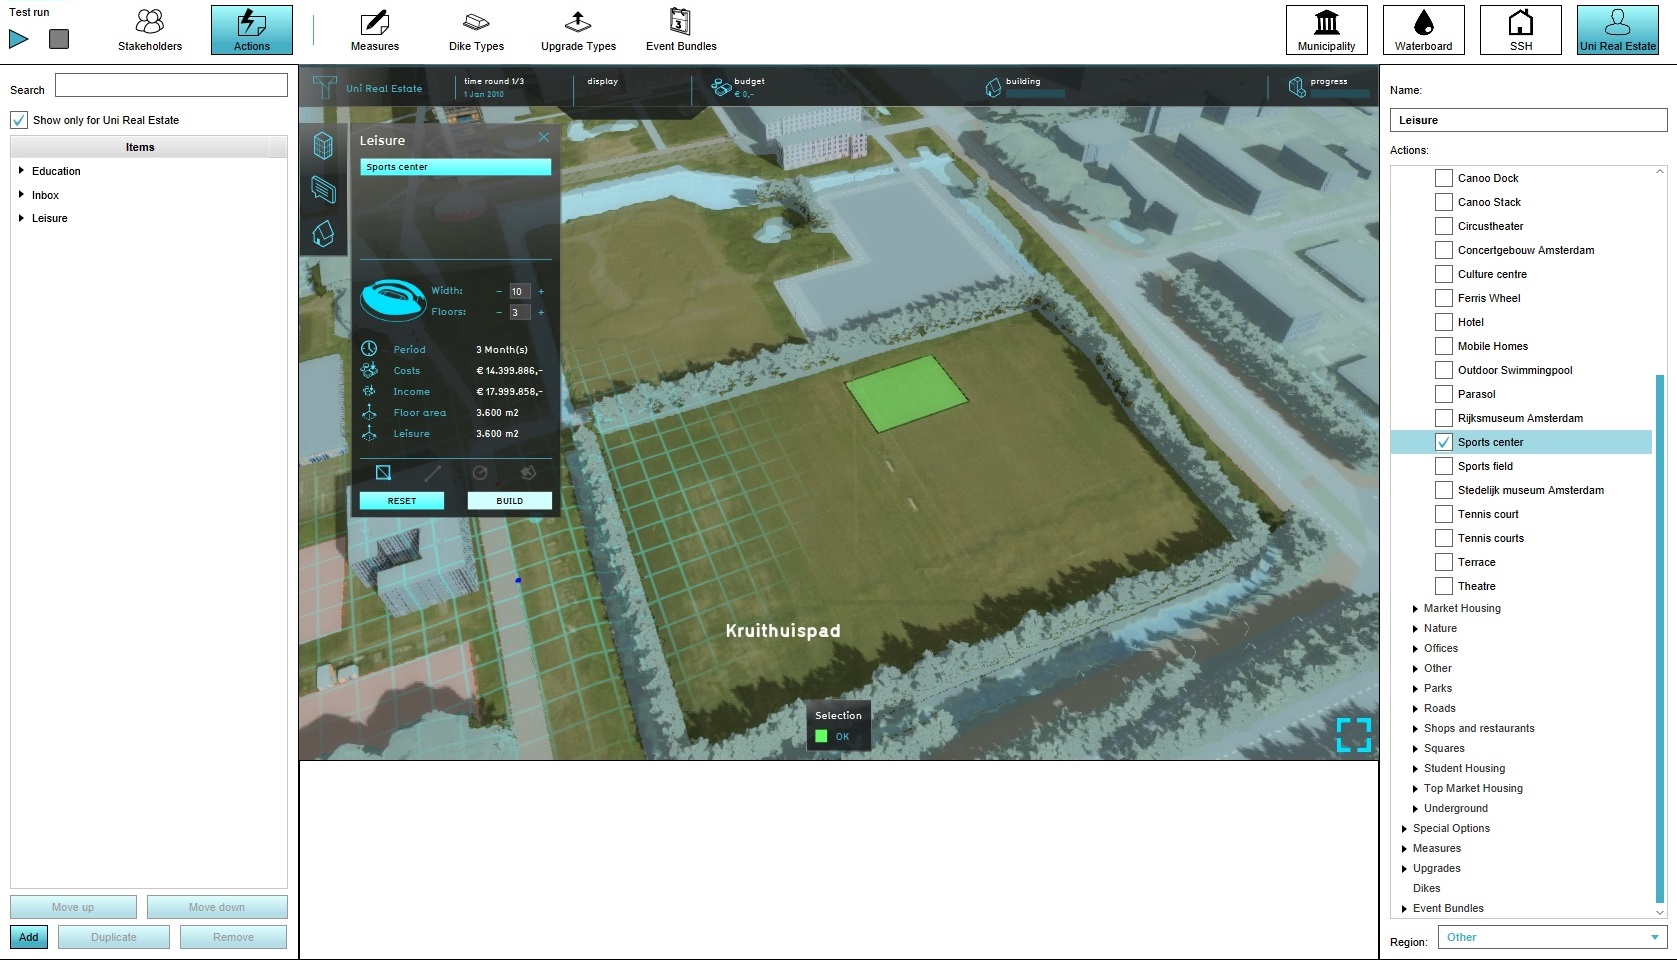
After this practice you can edit the project during a session or during a Testrun.
The assignment consist of four parts.
- Add a new action menu to the Uni Real Estate stakeholder and name it Leisure
- Add a build Sports Centre option to the action menu
- Build an Sports Centre building in the project
- (Notice the test run has started) Stop the Testrun and notice the new build building disappears.
If you need more information to execute these assignments go to the specific wiki pages with the in depth information.
- How add an action menu
- How to add a building to the action menu
- How to build a building
- What is a Testrun
For more information on this topic, visit the following pages:
Loading in GeoJSON
In this assignment you will load in a GeoJSON file into the editor.
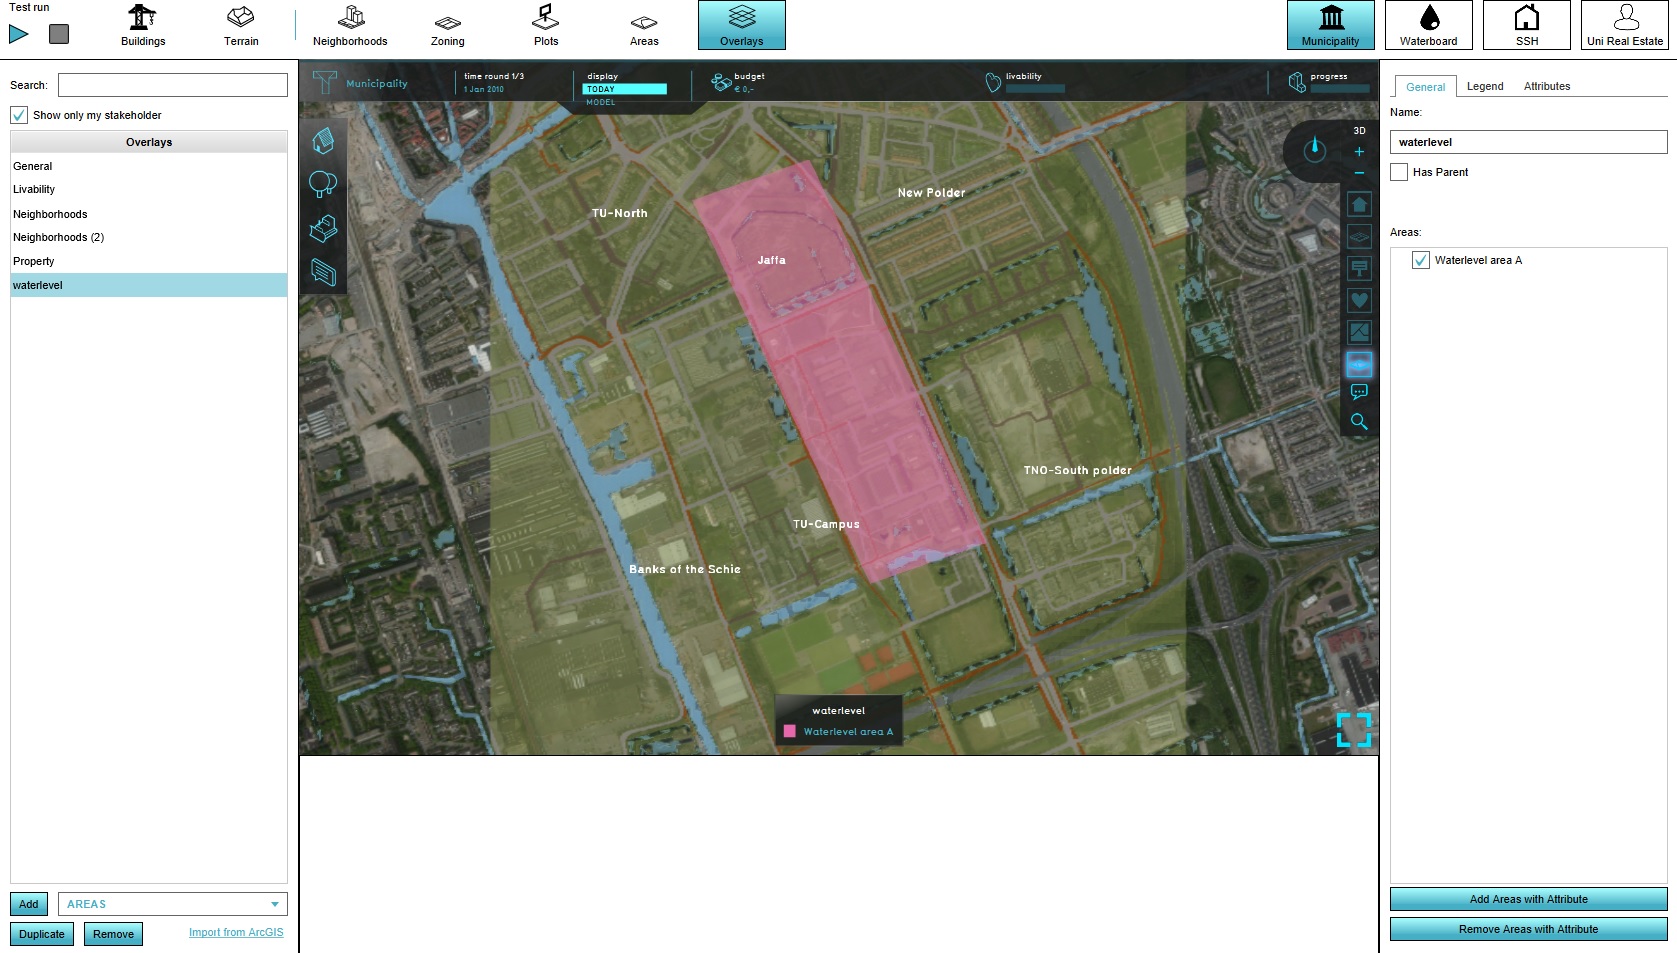
A file has been prepared with a water level area that can be imported in the Demo Basics Project. The file also contains (fictional) attribute values. By loading in this file into the editor, the new water level area is added with the attribute values as defined in the file.
In preparation download the example area file.
- Import the GeoJSON file as an area
- Verify the desired attributes are selected and finish the import process
- Make the area visible in an overlay
If you need more information to execute these assignments go to the specific wiki pages with the indepth information.
- How to add a GeoJSON file
- How to add an overlay
For more information on this topic, visit the following pages: