How to export a Grid Overlay to the GeoShare: Difference between revisions
Jump to navigation
Jump to search
No edit summary |
No edit summary |
||
| Line 10: | Line 10: | ||
}}</onlyinclude> | }}</onlyinclude> | ||
<gallery> | <gallery> | ||
File:export_grid_data_overlays.jpg|Export Grid Data by hovering over [[ | File:export_grid_data_overlays.jpg|Export Grid Data by hovering over [[Overlay]]s in the [[Ribbon]]. | ||
File:export_grid_data_geoshare_last_frame.jpg|Exporting the last frame of a [[Grid Overlay]] to the [[GeoShare]] | File:export_grid_data_geoshare_last_frame.jpg|Exporting the last frame of a [[Grid Overlay]] to the [[GeoShare]] | ||
File:export_grid_data_geoshare_all_frames.jpg|Exporting all timeframes of a [[Grid Overlay]] to the [[GeoShare]] | File:export_grid_data_geoshare_all_frames.jpg|Exporting all timeframes of a [[Grid Overlay]] to the [[GeoShare]] | ||
Revision as of 15:13, 29 March 2024
Grid Overlays can be exported as GeoTiffs to the GeoShare, either as a backup or as a means to share it with other applications. Additionally, a GeoShare Viewer can be added that allows users to visualize the Grid overlay results without the need of a keep alive project session.
How to create a GeoShare Viewer:
- In the Ribbon, select Overlays to show the list of all Overlays in the Project.
- Select the Grid Overlay the results of which you wish to share.
- Click on "Export Grid Data".
- In the prompt that appears, opt to save the last timeframe to the GeoShare
- The GeoShare window will remain open with the saved GeoTiff visible
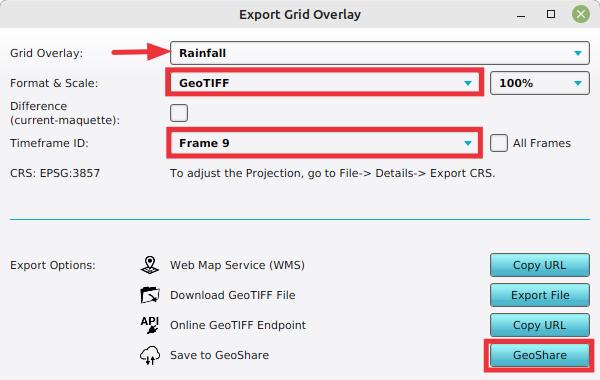
Exporting the last frame of a Grid Overlay to the GeoShare
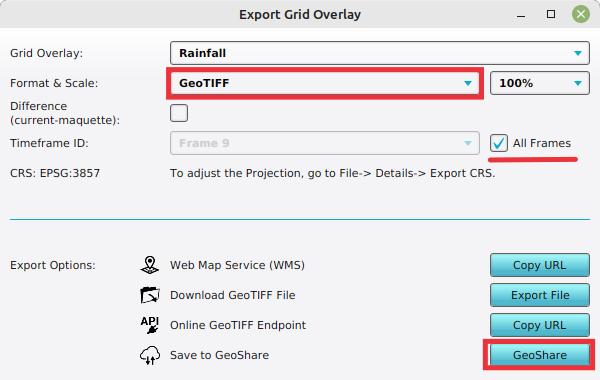
Exporting all timeframes of a Grid Overlay to the GeoShare


Notes
- A GeoShare Viewer can be added to a GeoShare that can visualize multiple exported GeoTiffs.
- Instead of exporting only the last timeframe, all timeframes can be exported at once by selecting this option using the choice box.
- The Export Grid Overlay panel can also be opened directly by selecting it in the Overlay popup in the Ribbon.