How to edit Events: Difference between revisions
mNo edit summary |
mNo edit summary |
||
| Line 1: | Line 1: | ||
{{learned|how to add events to an item|how to remove events from an item|how to change events}} | |||
: ''This article is specifically about adding, removing and editing events to a different item. For information about what an event is, see [[event]]s. | : ''This article is specifically about adding, removing and editing events to a different item. For information about what an event is, see [[event]]s. | ||
Revision as of 08:15, 26 August 2015
- This article is specifically about adding, removing and editing events to a different item. For information about what an event is, see events.
Events can be added to a number of items in a project. However, the steps for doing so, and the properties of events, do not vary much.
Adding and removing events

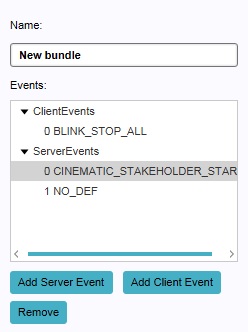
The right panel allows you to add and remove events. It also allows you to select events already added, to edit them.


At the bottom of the right panel, buttons are available with which to add and remove events. Depending on the item to which the events are to be added, both the options to add a Server Event and a Client Event to the item. Some items can only include Server Events. In this case only "Add Event" will be available, which will add a Server Event.
To add a Server Event, select "Add Event" or "Add Server Event". To add a Client Event (if possible), select "Add Client Event". The added event will, by default, be a dummy event with no effect.
- In the editor, select the item the event is to be added to.
- Select the appropriate "Add... " button.
To remove an event, select an event in the list of events, and select "Remove.
- In the editor, select the item the event is to be removed from.
- Select the event to remove in the list of events.
- Select "Remove".
Changing events
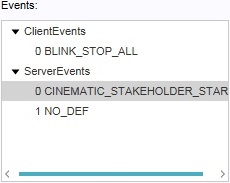
The right panel will show a list of events already connected to the item. In this list, an event can be selected to be edited. When an event is selected, it can be edited in the bottom panel.


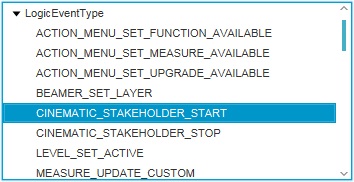
The most important property of an event is the event type (not to be confused with whether it is a Server Event or Client Event). The event type indicates what the effect is of an event. To change the event type, you can select the desired event type in the list of event types in the bottom panel.
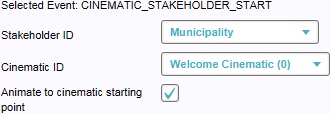
For some event types, additional parameters are required. These parameters are used to indicate specific items on (or with) which the event's effect is to be applied. They may also be the properties required to create new items during a session. When the selected event type requires additional parameters, additional input fields will appear on the right side of the bottom panel. The types of event parameters can vary, and as such the input fields for the parameters vary as well. A few examples:
- Other items are selected using dropdown menus.
- Yes-no options are configured using a checkbox.
- Texts can be entered in text fields.
When the appropriate event type has been selected, and the parameters have been set correctly, you must select "Commit" to store your changes. If you do not press "Commit" before selecting a different event or switching to another item, your changes are not saved. If you have made changes, and do not wish to store them, you can press "cancel" to undo your changes (before selecting commit).
- Select the event you wish to alter.
- Select the desired event type.
- If neccesary, set the appropriate parameters.
- Select "Commit".