Demo Breach Project
| Next page>> |

The Demo Breach project is available for all users and can be found in the main menu under Edit projects. This project does not count towards your license.
This project is intended for hydrologists and other water experts.
This project showcases the flooding overlay in a basic setup with a breach.
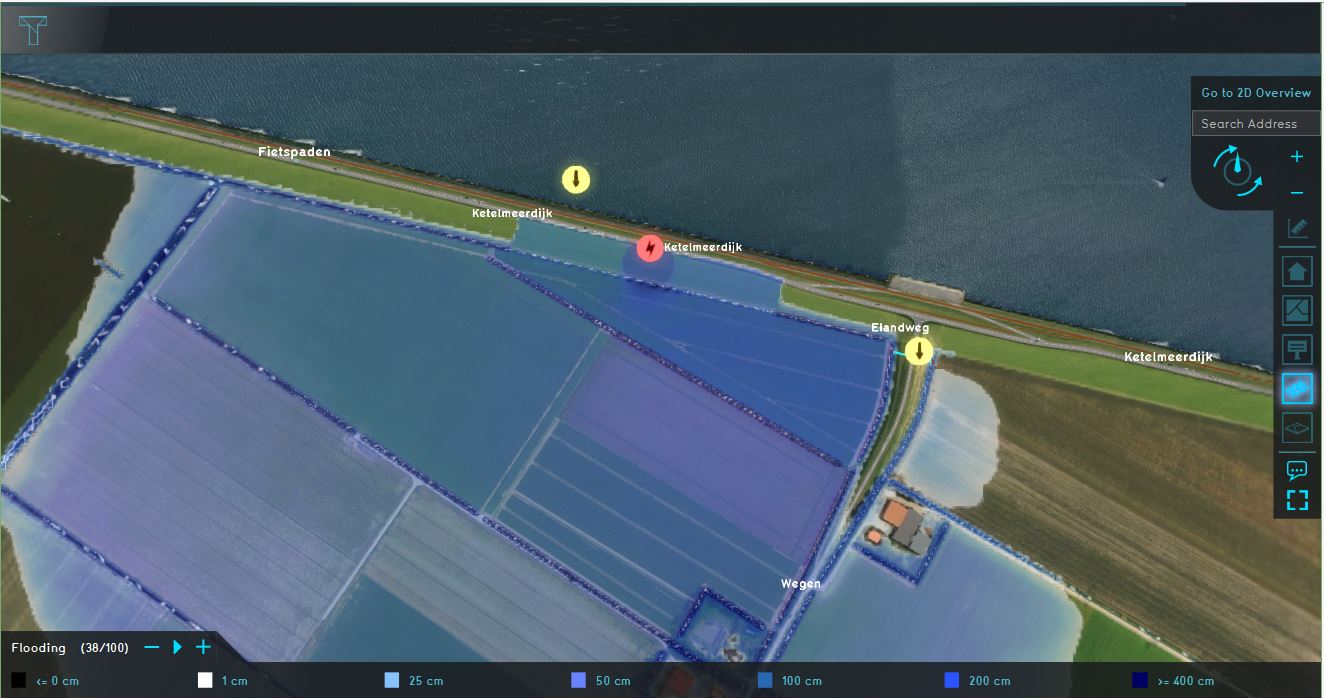
The demo is a working project in which a location in The Netherlands experiences a breach in a levee holding back a large amount of water. It can serve to explore how breaches are modeled in the Water Module, how they are configured, and how the consequences of a flooding can be analysed. The project simulates a breach which grows over time, allowing as much water to flow through as the lake contains and the dynamic size of the breach allows over a 1 hour period.
Exploring the project
To begin exploring the project, take the following steps:
- Click anywhere in the 3D world, and use the arrow keys on your keyboard to move around in the world. You can also drag the camera around by right-clicking (and holding the right mouse button down) in the 3D world and dragging the world around. Use the scroll wheel to zoom in- and out.
- On the right-hand side of the 3D world you can see the overlays menu. Hover over the various icons to see a tooltip with their name. Find the overlay named "Flooding", and click on it. This will show the overlay in the 3D world. This overlay shows the amount of water in the world during the flooding simulation.
- At the bottom of the interface a legend will now appear, with on the left-hand side of the legend a few buttons to "play" the overlay. Click on the "play" button, and you will see how the state of the water changes over time.
- Hover over the icon for the overlay again, and notice that more options appear for overlays related to flooding. These are the child overlays, which can display more types of results from the flooding simulation.
- Finally, notice a number of icons floating in the world. The orange icons are of particular note; these denote points-of-interest which you can take a closer look at. You can click on any to open a panel with more information.
Points of interest
Breach
A levee exists between the large lake to the north, and the farms and small groups of buildings to the south. On this levee, an "Area" has been drawn to represent the point of a breach. The properties of the breach are defined as attributes of the drawn Area. The breach starts small, but as part of the simulation, it will grow over time, allowing more water to flood in.
Clicking on the popup will show the Base Types overlay, which shows what features are present in the 3D world for the purpose of the flooding simulation.
Elevation
Culvert
External Water Level
Measurement tool
Actions
Levee
Analyse the project:
- Click on the arrows in the project to get familiar with the boundary conditions in the model.
- Go to the Flooding Overlay (named Flooding) in the Overlay bar. Play the flooding overlay and notice how the water flows for example, around the Culvert. This overlay shows the Surface last value result type. Another interesting result type to study is the Surface last speed.
- Go to the Base types result type, zoom in on the breach location and play the overlay to see how the breach grows over time. The light red area is the active breach area, the dark red area is part of the whole breach area. This is the available space for the active breach to grow depending on the set simulation time, the critical speed and the breach width.
- Take a look at the Surface elevation result type. This height data is used for the Water Overlay calculations. If you focus on the breach area, you can clearly see what the breach area does: lowering the terrain height so that water can flood the surface.
- Click on the Area menu in the Current Situation tab and select the area: breach in the left panel. In the right panel, select the attributes tab, focus on the attributes and their meaning. Especially the attributes relating to the external area. Since the project area is quite small it does not contain the whole body of water (Ijsselmeer). With no additional settings only the water in the project area would be used as the amount of water which can flow through the breach. Since we would like a more 'realistic' model, the breach area is configured with external area attributes. These attributes enable the use of the Ijsselmeer's whole capacity, without having to create a large project. See the following pages for an explanation of the attributes: External area, External surface level and External Water level.
- Open the flooding wizard and take a look at the settings for the flood event, breach, culvert and output overlays.
| Next page>> |