Exporting Blender models to CityJSON: Difference between revisions
| Line 23: | Line 23: | ||
1. Rename your collection (name of the group the model is in) in the outliner to "LoD2" by double clicking on it. Make sure that your model is part of this collection.<br><br> | 1. Rename your collection (name of the group the model is in) in the outliner to "LoD2" by double clicking on it. Make sure that your model is part of this collection.<br><br> | ||
[[File:Outliner.png | [[File:Outliner.png|300px]]<br>''The outliner in Blender.''<br> | ||
2. Rename your model to the following specification: '''0: [LoD0] ID_of_object'''. The "0" represents the LOD and "ID-of_object" represents the name of the object. So for example a level 2 house model could be renamed as: '''2: [LoD2] Building'''<br> | 2. Rename your model to the following specification: '''0: [LoD0] ID_of_object'''. The "0" represents the LOD and "ID-of_object" represents the name of the object. So for example a level 2 house model could be renamed as: '''2: [LoD2] Building'''<br> | ||
3. In the object properties add 2 new custom properties to your model: | 3. In the object properties add 2 new custom properties to your model: | ||
Revision as of 10:21, 29 March 2021
Introduction
It is possible to import CityGML file into the Tygron Platform. This article deals with exporting a Blender model to CityJSON so that it can be imported into the Tygron Platform via the CityGML importer.
(Blender is the free and open source 3D creation suite. To learn more about blender visit https://www.blender.org/ or https://en.wikipedia.org/wiki/Blender_(software))
In order to export Blender models to CityJSON we first need to install the Up3date exporter and install it as an add-on in to Blender. This add-on was originally developed by Konstantinos Mastorakis (konmast3r) as part of their research orientation project for the MSc Geomatics programme of TU Delft. Its functionality was further developed for the needs of their MSc thesis An integrative workflow for 3D city model versioning.
To read the documentation go to https://github.com/cityjson/Up3date#exporting-a-3d-city-model.
Setting up the exporter in Blender.
1. Visit https://github.com/cityjson/Up3date and download the zip file from the green Code dropdown menu on the right side.
2. Open Blender and go to Edit -> Preferences.
3. In the preference dialog click on "Add-ons". You can see a list of the add-ons which are available for Blender.
4. Click on "Install" in the top right and select the zip file which you have downloaded.
5. After install the exporter will be available in the list. (Import-Export: Import CityGML)
6. Click on the checkbox next to it to activate the exporter.
7. Close the Preferences dialog.
Preparing your model for export
There is a small setup needed in order to export your model succesfully to CityJSON. This consists of naming conventions and custom properties that need to be added to your model and Blender environment. Another important issue is the Levels of Detail that need to be setup. CityGML supports 4 levels. from 0 to 4. 0 is the most low resolution version of the model. This means the polycount is very small. 4 is the most dense. Levels of Detail are primarily used in real time engines like the Tygron Platform to load the appropriate size model for the particular zoom level. This helps reduce memory when a large area is displayed. In this setup we will be using the Level of Detail 2. If you have have more the workflow is the same and just repeat it for the other levels. (Consult screenshots for more clarification)
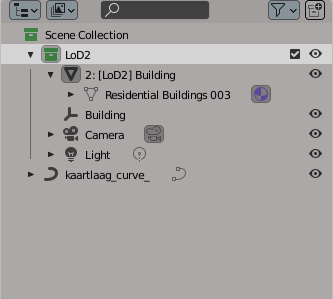
1. Rename your collection (name of the group the model is in) in the outliner to "LoD2" by double clicking on it. Make sure that your model is part of this collection.

The outliner in Blender.
2. Rename your model to the following specification: 0: [LoD0] ID_of_object. The "0" represents the LOD and "ID-of_object" represents the name of the object. So for example a level 2 house model could be renamed as: 2: [LoD2] Building
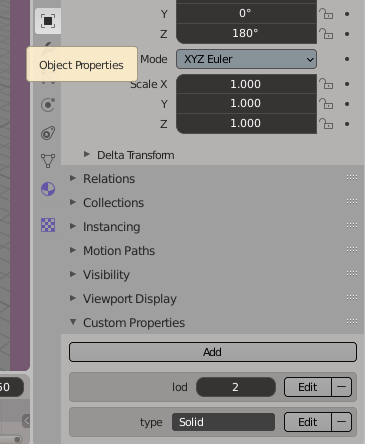
3. In the object properties add 2 new custom properties to your model:
- type: the_surface_type (Surface, MultiSurface, CompositeSurface and Solid are accepted)
- lod : the_number_of_lod
So for this example the type would be "Solid" and the lod would be "2"

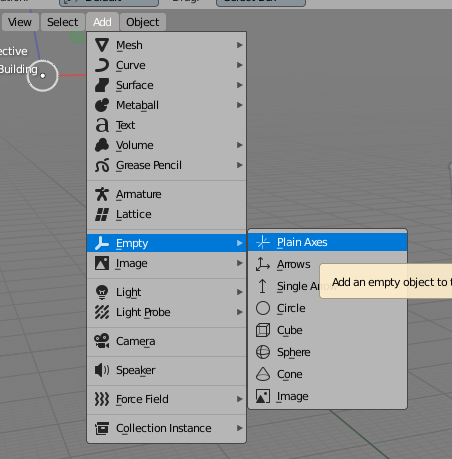
4. Add an empty object to the scene and rename it to the "ID_of_object". So in this example it would be "Building".

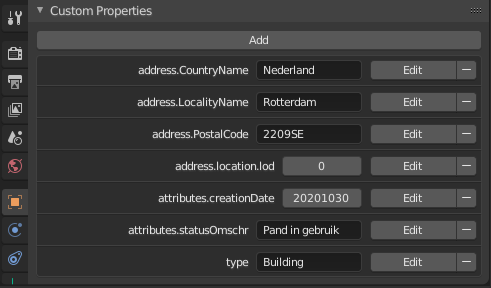
5. Add a custom property to the empty object:
- type: Building
You could add more properties to the object as needed such as "address.PostalCode: 0000AB". This depends on what meta information you would like to export with your model.
