Image Overlay: Difference between revisions
No edit summary |
No edit summary |
||
| Line 2: | Line 2: | ||
==What is the Image overlay== | ==What is the Image overlay== | ||
The Image overlay is a | The Image overlay is a layer that allows users to upload and display images over the project area in the Tygron Engine. <br> | ||
A much used possibility of the Image Overlay is to import [[WMS]] data: geographically referenced data, accessible through an url. <br> | |||
It is also possible to add a custom Image. Keep in mind that the allowed image size for custom images is 1024x1024 pixels. The image must also be in the .PNG format, the Portable Network Graphics format, which is a raster graphics file format that supports lossless data compression. | |||
==How to configure the Image overlay== | ==How to configure the Image overlay== | ||
{{Editor ribbon|header=3D World|bar=Overlays}} | {{Editor ribbon|header=3D World|bar=Overlays}} | ||
After adding the Image Overlay, the Configuration Wizard can be found on the right side of the screen. This wizard helps with importing the image. | |||
There are three methods to import an Image: <br> | |||
# '''Import an Image from a file.''' With this method a custom Image can be imported. Keep in mind that the size of the image should be 1024x1024 pixels and in .png format. | |||
# '''Import from a Web Image Service.''' With this method it is possible to import a [[WMS]]. Read the corresponding page on how to import [[WMS]] data. <br> | |||
# '''Select an Existing image.''' This method differs from the first option in that it is now possible to already select an existing (imported) Image from the Engine to display as an Overlay. | |||
==Adding and removing the Image overlay== | ==Adding and removing the Image overlay== | ||
{{Editor ribbon|header=3D World|bar=Overlays}} | {{Editor ribbon|header=3D World|bar=Overlays}} | ||
{{Editor steps|title=add an Image overlay|Select in the editor '3D World' from the ribbon|Select 'Overlays' > 'Edit overlays' from the ribbon bar|Select the Image overlay from the drop down menu on the bottom of the left panel|Select 'Add' from the bottom of the left panel|Rename the overlay, if required, on the right panel| | {{Editor steps|title=add an Image overlay|Select in the editor '3D World' from the ribbon|Select 'Overlays' > 'Edit overlays' from the ribbon bar|Select the Image overlay from the drop down menu on the bottom of the left panel|Select 'Add' from the bottom of the left panel|Rename the overlay, if required, on the right panel|Use the Configuration Wizard to import an Image|The overlay icon will now appear on the right side of the interface}} | ||
<gallery> | <gallery> | ||
| Line 36: | Line 26: | ||
File:SelectAddOverlay.jpg|4. Select 'Add' from the bottom of the left panel | File:SelectAddOverlay.jpg|4. Select 'Add' from the bottom of the left panel | ||
File:OverlayParameters.jpg|5&6. Select and configure available properties on the right panel | File:OverlayParameters.jpg|5&6. Select and configure available properties on the right panel | ||
File:OverlayIconPresent.jpg|7. The overlay icon will | File:OverlayIconPresent.jpg|7. The overlay icon will now appear on the right side of the interface | ||
</gallery> | </gallery> | ||
Revision as of 12:22, 6 August 2018
What is the Image overlay
The Image overlay is a layer that allows users to upload and display images over the project area in the Tygron Engine.
A much used possibility of the Image Overlay is to import WMS data: geographically referenced data, accessible through an url.
It is also possible to add a custom Image. Keep in mind that the allowed image size for custom images is 1024x1024 pixels. The image must also be in the .PNG format, the Portable Network Graphics format, which is a raster graphics file format that supports lossless data compression.
How to configure the Image overlay
After adding the Image Overlay, the Configuration Wizard can be found on the right side of the screen. This wizard helps with importing the image.
There are three methods to import an Image:
- Import an Image from a file. With this method a custom Image can be imported. Keep in mind that the size of the image should be 1024x1024 pixels and in .png format.
- Import from a Web Image Service. With this method it is possible to import a WMS. Read the corresponding page on how to import WMS data.
- Select an Existing image. This method differs from the first option in that it is now possible to already select an existing (imported) Image from the Engine to display as an Overlay.
Adding and removing the Image overlay
- Select in the editor '3D World' from the ribbon
- Select 'Overlays' > 'Edit overlays' from the ribbon bar
- Select the Image overlay from the drop down menu on the bottom of the left panel
- Select 'Add' from the bottom of the left panel
- Rename the overlay, if required, on the right panel
- Use the Configuration Wizard to import an Image
- The overlay icon will now appear on the right side of the interface
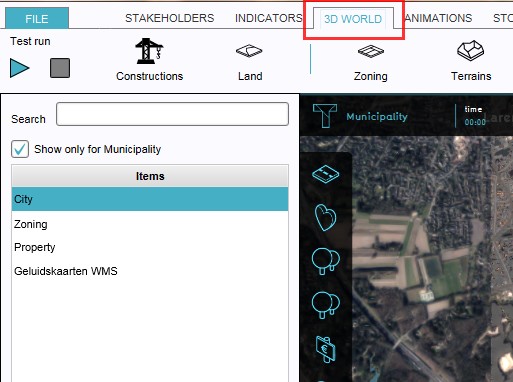
1. Select 3D World
- SelectEditOverlay.jpg
2. Select Overlays > Edit overlays
- SelectDropDown.jpg
3. Select desired overlay from drop down menu on the bottom of the left panel
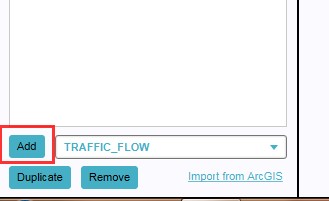
4. Select 'Add' from the bottom of the left panel
- OverlayParameters.jpg
5&6. Select and configure available properties on the right panel
- OverlayIconPresent.jpg
7. The overlay icon will now appear on the right side of the interface


- Select in the editor '3D World' from the ribbon
- Select 'Overlays' > 'Edit overlays' from the ribbon bar
- Select the desired overlay from the list of active overlays on the left panel
- Select 'remove' from the bottom of the left panel
- Confirm the removal in the pop up confirmation message
1. Select 3D World
- SelectEditOverlay.jpg
2. Select Overlays > Edit overlays
- SelectOverlay.jpg
3. Select desired overlay from the list of active overlays on the left panel
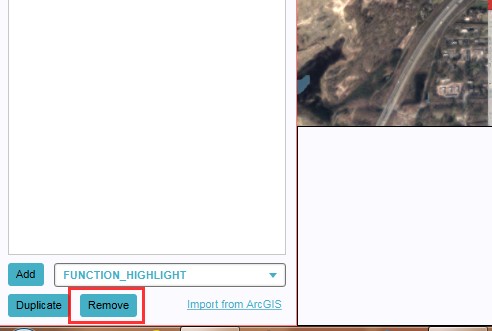
4. Select 'Remove' from the bottom of the left panel
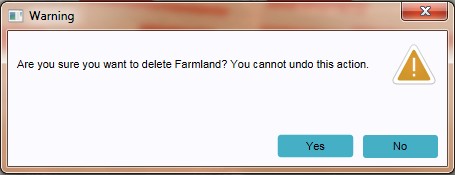
5. Confirm the removal in the pop up confirmation message

Sometimes it can be convenient to duplicate an already existing overlay. To do so, follow the steps for removal, but select 'Duplicate' in stead of 'Remove'.