Trees and foliage tutorial: Difference between revisions
mNo edit summary |
|||
| (64 intermediate revisions by the same user not shown) | |||
| Line 1: | Line 1: | ||
{{tutorial prerequisites | {{tutorial prerequisites | ||
|project=The tutorial makes use of the [[Demo Heat Stress Project]]. If possible, a copy should be created because one of the steps involves uploading a new file. If this is undesirable, a file already present in the [[Project]] can be used. | |||
|Start the [[Demo Heat Stress Project]]. | |Start the [[Demo Heat Stress Project]]. | ||
|If possible, use a [[Save as]] operation to create a copy of the [[Project]]. | |||
}} | }} | ||
==Tree and foliage data in general== | ==Tree and foliage data in general== | ||
There are a number of use-cases in which having accurate green data is relevant. In urban development, green is become more and more of a required spatial aspect. But also for topics like biodiversity and heat stress the impact of the presence of green is significant. It is therefor important to have as accurate data as possible related to the presence of green in an urban environment for a variety of simulation use-cases. | There are a number of use-cases in which having accurate green data is relevant. In urban development, green is become more and more of a required spatial aspect. But also for topics like biodiversity and heat stress the impact of the presence of green is significant. It is therefor important to have as accurate data as possible related to the presence of green in an urban environment for a variety of simulation use-cases. | ||
The {{software}} will, when a new [[Project]] of a real location is generated, automatically attempt to obtain open data about trees. However, depending on the use-case more accurate datasets may be required and available. In these cases, knowing how to properly manage data about trees (or foliage thereof) will improve the quality of calculations and thus the results. | |||
For this tutorial, there will be a focus on using trees and foliage data with and for the [[Heat Overlay]], but the principles translate over to other use-cases as well. | For this tutorial, there will be a focus on using trees and foliage data with and for the [[Heat Overlay]], but the principles translate over to other use-cases as well. | ||
===Trees and foliage data in the {{software}}=== | |||
In the {{software}}, trees are stored as a specific [[Function]] (or collection of [[Function]]s) of [[Building]]s. By default, the {{software}} generates trees with the [[Function]] of "Default decidiuous trees". Trees can exist as either small polygons (effectively points) to symbolize a single tree in a fixed location, or as a broader polygon to symbolize a group of trees (such as a treeline or a forest). | |||
The visualization of trees governed by a single [[Attribute]] or [[Function Value]]: [[Floor height m (Function Value)|FLOOR_HEIGHT_M]]. This [[Attribute]], in amounts of meters, will affect how tall the tree is visualized. | |||
For the [[Heat Overlay]], it isn't the trees data directly which is required for the calculations, but actually the foliage of the trees. The foliage casts significant shadows and thus affects the impact of solar radiation. By default, because there isn't a general datasource for foliage, the {{software}}'s [[Heat Overlay]] can instead derive an estimation of foliage from the trees data. This is done by effectively buffering the tree polygon with a certain amount of meters. That amount is determined by the [[Foliage crown factor (Function Value)|FOLIAGE_CROWN_FACTOR]], which is the ratio of foliage radius to tree height. This allows for a spatial dataset of foliage to be estimated based on the presence of trees. | |||
For more information about how trees relate to the [[Heat Overlay]], consult the documentation: | |||
* [[Foliage height calculation model (Heat Overlay)]] | |||
* [[Shade calculation model (Heat Overlay)]] | |||
{{page break}} | |||
==Preparation== | ==Preparation== | ||
For the purpose of this tutorial, 2 datasets are needed, which can be obtained from the [[Public Share]] as is. The [[Heat Overlay]] will also need to have one of its settings changed, both so that there is a baseline from which a change can be seen after the process completes, but also to correctly connect the [[Heat Overlay]] with the intended datasource. | |||
===Obtaining trees and foliage data=== | |||
Go to: | |||
{{editor location|geoshare|Public Share (top-right of the Geoshare window)}} | |||
This provides access to the [[Public Share]]. | |||
[[File:public-share-small.jpg|650px|frame|center|The Public Share.]] | |||
{{page break}} | |||
Navigate to the following directory: tutorials/tutorial_trees_and_foliage/ | |||
[[File:public-share-tutorial-trees-and-foliage-small.jpg|650px|frame|center|The Public Share offers a number of files relevant for this tutoruial.]] | |||
The "trees data" [[GeoJSON]] file contains a vector dataset with some tree data of the environment of the [[Demo Heat Stress Project]]. | |||
The "foliage data" [[GeoTIFF]] file contains a grid dataset with information about foliage heights in and around the [[Demo Heat Stress Project]]. | |||
{{page break}} | |||
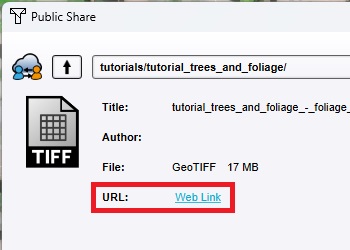
For all files, select them by clicking on them, and then access them by clicking on "Web Link". This will open the file in the web browser, and prompt a download. | |||
[[File:public-share-tutorial-trees-and-foliage-weblink-highlight.jpg|350px|frame|center|The web link will open the file in the web browser, and either prompt a download or easily allow for a download.]] | |||
{{page break}} | |||
===Resetting foliage source of the Heat Overlay=== | |||
Finally, it is necessary to ensure the Heat Overlay now operates from a basis where it does not have any foliage information, so that the results of importing data can be verified. | |||
Go to: | |||
{{editor location|overlay|PE Temperature}} | |||
[[File:tutorial trees pe temperature overlay-small.jpg|650px|frame|center|Select the PE Temperature Overlay.]] | |||
In the [[right panel]], click on "Configuration Wizard". This opens the [[Heat Overlay Wizard (Heat Overlay)|Heat Overlay Wizard]]. | |||
In the | |||
[[File:tutorial trees pe temperature overlay wizard button.jpg|650px|frame|center|Open the Wizard by clicking the button.]] | |||
{{page break}} | |||
Continue to the step regarding Foliage. | |||
[[File:tutorial trees pe temperature overlay wizard step foliage.jpg|650px|frame|center|The step for foliage. In the demo it is set to refer to another Overlay.]] | |||
Opt to use "Tree Functions" height and foliage crown factor. | |||
[[File:tutorial trees pe temperature overlay wizard step foliage2.jpg|650px|frame|center|Change the setting to refer to the tree Functions.]] | |||
Close the Configuration Wizard. | |||
{{page break}} | |||
Click on "Update now" in the [[right panel]] to force the Overlay to recalculate. | |||
[[File:tutorial trees pe temperature overlay update now highlight.jpg|650px|frame|center|Click on "Update now" to recalculate all [[Overlay]]s in the Project.]] | |||
The | Notice the results for the Project have changed. This is because the calculation now relies on a different dataset. | ||
[[File:tutorial trees pe temperature overlay result 0-small.jpg|650px|frame|center|The results of the [[Heat Overlay]] now that we changed the foliage setting.]] | |||
{{page break}} | |||
==Using trees data== | |||
An accurate dataset of trees will allow for an accurate counting of surface area used for the purposes of urban green. It can also be used by models such as the [[Heat Overlay]] to extrapolate foliage from, which affects the calculations for heat stress. | |||
===Removing existing trees from the Project=== | ===Removing existing trees from the Project=== | ||
Before new trees data can be imported, the existing trees data should be removed. Otherwise, the original data may persist together with the new to-be-imported data, and throw off the results of calculations relying on the trees. | Before new trees data can be imported, the existing trees data should be removed. Otherwise, the original data may persist together with the new to-be-imported data, and throw off the results of calculations relying on the trees. | ||
Go to: | |||
{{editor location|Buildings|dropdown=Edit multiple Buildings}} | |||
[[File:tutorial trees select multiple buildings.jpg|650px|frame|center|Find the "Select Multiple Buildings" option.]] | |||
In the [[bottom panel]], an interface now allows for the mass-manipulation of multiple [[Building]]s at the same time, based on [[Function]] and extent. | In the [[bottom panel]], an interface now allows for the mass-manipulation of multiple [[Building]]s at the same time, based on [[Function]] and extent. | ||
[[File:tutorial trees select multiple buildings bp.jpg|650px|frame|center|The panel which appears at the bottom of the screen.]] | |||
{{page break}} | |||
As category, select "Specific Function". | As category, select "Specific Function". | ||
As Function, select "Default Decidiuous Trees". This is the default type of trees and means this operation will only affect trees. | As Function, select "Default Decidiuous Trees". This is the default type of trees and means this operation will only affect trees. | ||
[[File:tutorial trees function select trees-small.jpg|650px|frame|center|Find "Default Decidiuous Trees" in the "Nature" category.]] | |||
As action, select "REMOVE" | As action, select "REMOVE" | ||
[[File:tutorial trees select multiple buildings bp2.jpg|650px|frame|center|The configured action for multiple Buildings.]] | |||
{{page break}} | |||
Click on "Entire Map" | Click on "Entire Map" | ||
[[File:tutorial trees select multiple buildings bp entire map.jpg|350px|frame|center|Use the "Entire Map"option to clear the applicable Buildings everywhere in the Project.]] | |||
A prompt will appear. Confirming it will delete the 160 or so trees from the Project, leaving it without any trees data. | A prompt will appear. Confirming it will delete the 160 or so trees from the Project, leaving it without any trees data. | ||
=== | [[File:tutorial trees select multiple buildings confirm.jpg|350px|frame|center|The confirmation prompt to perform the operation.]] | ||
{{editor location|Overlay|PE Temperature}} | |||
Click on "Update now" in the [[right panel]] to force the Overlay to recalculate. | |||
[[File:tutorial trees pe temperature overlay update now highlight.jpg|650px|frame|center|Use this option again to recalculate all Overlays.]] | |||
{{page break}} | |||
Notice the results for the entire Project are now significantly hot. This is because there is now no foliage data for the [[Heat Overlay]] to work with. | |||
[[File:tutorial trees pe temperature overlay result 1-small.jpg|650px|frame|center|The results of the PE Temperature Overlay after removing the trees, thus leaving the simulation without foliage.]] | |||
{{page break}} | |||
===Importing trees data=== | |||
Go to: | |||
{{editor location|buildings|dropdown=Import Geo data}} | |||
This opens the [[Geo Data Wizard]]. | |||
[[File:tutorial trees geo import.jpg|650px|frame|center|Find the "Geo Data Import" option for [[Building]]s.]] | |||
{{page break}} | |||
As import method, select "GeoJSON file". | |||
[[File:tutorial trees geo import1-small.jpg|650px|frame|center|Select "GeoJSON file".]] | |||
{{page break}} | |||
As GeoJSON file, click on "select local file". Select the previously downloaded trees geojson file. | |||
[[File:tutorial trees geo import2-small.jpg|650px|frame|center|Select the GeoJSON file you downloaded previously.]] | |||
{{page break}} | |||
Take note of the "View features" step, where the locations of all trees are shown. | |||
[[File:tutorial trees geo import3-small.jpg|650px|frame|center|View the features to confirm whether the dataset is correct and where to expect the (new) data.]] | |||
Also take note of the "buffer size" slider. when the dataset consists of points, all points will be buffered with the size indicated by the slider. By default all such points end up as polygons of exactly 1m² in size. Any polygons in the dataset will remain as-is. | |||
{{page break}} | |||
Skip through the step for filtering features (all features are desired), adding or updating features (the default is to add, which is what we nat to do), and the naming scheme (names are not relevant for calculations). | |||
[[File:tutorial trees geo import4-small.jpg|150px|frame|center|Filtering allows a subset of features to be imported, which is useful if the dataset contains, for example, removed trees as well.]] | |||
[[File:tutorial trees geo import5-small.jpg|150px|frame|center|Naming of the resulting features is not relevant for the purpose of calculations.]] | |||
{{page break}} | |||
In the "Select Attributes" step, take note of the [[Attribute]] [[Floor height m (Function Value)|FLOOR_HEIGHT_M]]. This [[Attribute]] determines the height of the trees which are imported. If the dataset of trees has a different [[Attribute]] which indicates the tree height of features, find that [[Attribute]] in the list of [[Attribute] names, and then edit the name of the [[Attribute]] as it is imported using the text input fields in the middle of the screen. | |||
[[File:tutorial trees geo import6 highlight-small.jpg|150px|frame|center|Take special note that whichever attribute represents the height of trees is imported as FLOOR_HEIGHT_M.]] | |||
{{page break}} | |||
In the "Assign Functions" step, keep "One Function" selected, and click on "Select" to select the default function. | |||
Select "Default Decidiuous Trees", and continue to the next step. | |||
[[File:tutorial trees geo import7-small.jpg|650px|frame|center|Select the appropriate tree Function.]] | |||
{{page break}} | |||
For the "Owner", select the Municipality. | |||
[[File:tutorial trees geo import8-small.jpg|650px|frame|center|The Municipal stakeholder is a good default for most import operations.]] | |||
Continue to the last step of the Wizard and click on "Finalize" to add the data to the [[Project]]. | |||
Go to: | |||
{{editor location|Overlay|PE Temperature}} | |||
Click on "Update now" in the [[right panel]] to force the Overlay to recalculate. | |||
[[File:tutorial trees pe temperature overlay update now highlight.jpg|650px|frame|center|Recalculate all [[Overlay]]s in the Project again.]] | |||
{{page break}} | |||
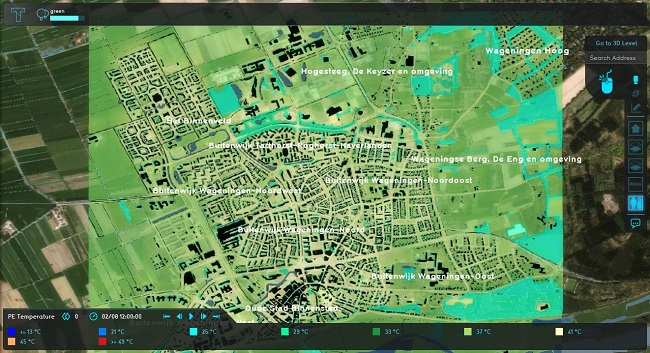
Notice that in the areas where tree data was loaded in, the calculated temperature has dropped significantly. | |||
[[File:tutorial trees pe temperature overlay result 2-small.jpg|650px|frame|center|The results of this data are especially notable outside the city centre, as that is where the data exists.]] | |||
Also inspect the "Foliage" child Overlay of the [[Heat Overlay]], which shows the presence of foliage. | |||
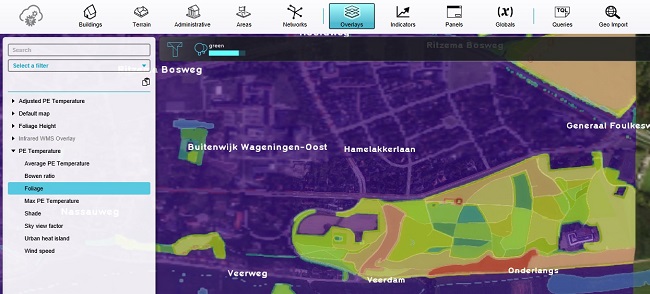
[[File:tutorial trees pe temperature overlay result foliage1-small.jpg|650px|frame|center|The locations of foliage can be seen to better understand the results of the calculation.]] | |||
{{page break}} | |||
==Using foliage grid data== | |||
Instead of relying on point data for trees, from which the {{software}} then extrapolates foliage coverage, it is also possible to supply a dataset of foliage directly. This is a grid of foliage heights which the [[Heat Overlay]] can then use for its calculations. | |||
===Importing foliage grid data=== | |||
{{editor location|Overlays|dropdown=Custom, GeoTIFF Overlay}} | |||
[[File:tutorial trees add geotiff overlay.jpg|650px|frame|center|Adding a new [[GeoTIFF Overlay]] from the dropdown.]] | |||
A GeoTiff Overlay is now added to the list of Overlays, and selected. | |||
In the [[right panel]], switch to the "TIFFs" tab. | |||
[[File:tutorial trees tiffs tab.jpg|350px|frame|center|The TIFFs tab.]] | |||
{{page break}} | |||
At the bottom of the [[right panel]], click on "Add". | |||
[[File:tutorial trees tiffs add.jpg|350px|frame|center|Click on "Add" to add GeoTIFFs to the Overlay to display.]] | |||
A window appears which can be used to manage [[GeoTiff]] assets in a [[Project]]. | |||
[[File:tutorial trees tiff manager-small.jpg|350px|frame|center|This screen allows for managing all GeoTIFFs uploaded to the Project.]] | |||
{{page break}} | |||
Click on "Add local file", and select the previously downloaded GeoTIFF file. | |||
[[File:tutorial trees tiff manager add local.jpg|350px|frame|center|Add local file allows the uploading of a file from the computer to the Project.]] | |||
(Note that if the import of the file fails because you're working directly in the Demo Project, you can continue the rest of the steps with the already present "filteredtrees.tiff") | |||
Select the imported tiff in the listing, and click "Ok". | |||
[[File:tutorial trees tiff manager2-small.jpg|350px|frame|center|After the import completes, the GeoTIFF can be selected and confirmed.]] | |||
{{page break}} | |||
The tiff is now added to the listing. | |||
[[File:tutorial trees tiff list.jpg|350px|frame|center|The GeoTIFF is added to the Overlay.]] | |||
{{page break}} | |||
===Connecting foliage grid to Heat Overlay=== | |||
Go to: | |||
{{editor location|Overlays|PE Temperature}} | |||
In the [[right panel]], click on "Configuration Wizard". This opens the [[Heat Overlay Wizard (Heat Overlay)|Heat Overlay Wizard]]. | In the [[right panel]], click on "Configuration Wizard". This opens the [[Heat Overlay Wizard (Heat Overlay)|Heat Overlay Wizard]]. | ||
| Line 64: | Line 253: | ||
Continue to the step regarding Foliage. | Continue to the step regarding Foliage. | ||
[[File:tutorial trees pe temperature overlay wizard step foliage2.jpg|650px|frame|center|The foliage step of the Heat Overlay's configuration wizard.]] | |||
Opt to use a Grid Overlay to define the Foliage. | |||
[[File:tutorial trees pe temperature overlay wizard step foliage.jpg|650px|frame|center|Change the configuration to refer to a Grid Overlay.]] | |||
{{page break}} | |||
In the next step, select the newly added "GeoTIFF", which contains the foliage data. | |||
[[File:tutorial trees foliage pe temperature overlay wizard step foliage3.jpg|650px|frame|center|Select the [[GeoTIFF Overlay]] added earlier.]] | |||
Close the Wizard, and click on "Update now" in the [[right panel]]. | |||
[[File:tutorial trees pe temperature overlay update now highlight.jpg|650px|frame|center|Again recalculate all [[Overlay]]s.]] | |||
{{page break}} | |||
Notice that in the areas with more foliage coverage according to the tiff, the calculated temperature has dropped significantly. | |||
[[File:tutorial trees pe temperature overlay result 2-small.jpg|650px|frame|center|The temperature across the Project has changed.]] | |||
Also inspect the "Foliage" child Overlay of the [[Heat Overlay]], which shows the presence of foliage. | |||
[[File:tutorial trees pe temperature overlay result foliage1-small.jpg|650px|frame|center|The map of foliage is a lot more detailed.]] | |||
{{Tutorial completed | {{Tutorial completed | ||
| learned=how to import trees and foliage data, with an emphasis for use with the [[Heat Overlay]] | | learned=how to import trees and foliage data, with an emphasis for use with the [[Heat Overlay]] | ||
}} | }} | ||
Latest revision as of 12:51, 16 May 2023
Prerequisites
The following prerequisites should be met before starting this tutorial:
- The tutorial makes use of the Demo Heat Stress Project. If possible, a copy should be created because one of the steps involves uploading a new file. If this is undesirable, a file already present in the Project can be used.
Preparations
Take the following steps as preparation for following this tutorial:
- Start the Demo Heat Stress Project.
- If possible, use a Save as operation to create a copy of the Project.
Tree and foliage data in general
There are a number of use-cases in which having accurate green data is relevant. In urban development, green is become more and more of a required spatial aspect. But also for topics like biodiversity and heat stress the impact of the presence of green is significant. It is therefor important to have as accurate data as possible related to the presence of green in an urban environment for a variety of simulation use-cases.
The Tygron Platform will, when a new Project of a real location is generated, automatically attempt to obtain open data about trees. However, depending on the use-case more accurate datasets may be required and available. In these cases, knowing how to properly manage data about trees (or foliage thereof) will improve the quality of calculations and thus the results.
For this tutorial, there will be a focus on using trees and foliage data with and for the Heat Overlay, but the principles translate over to other use-cases as well.
Trees and foliage data in the Tygron Platform
In the Tygron Platform, trees are stored as a specific Function (or collection of Functions) of Buildings. By default, the Tygron Platform generates trees with the Function of "Default decidiuous trees". Trees can exist as either small polygons (effectively points) to symbolize a single tree in a fixed location, or as a broader polygon to symbolize a group of trees (such as a treeline or a forest).
The visualization of trees governed by a single Attribute or Function Value: FLOOR_HEIGHT_M. This Attribute, in amounts of meters, will affect how tall the tree is visualized.
For the Heat Overlay, it isn't the trees data directly which is required for the calculations, but actually the foliage of the trees. The foliage casts significant shadows and thus affects the impact of solar radiation. By default, because there isn't a general datasource for foliage, the Tygron Platform's Heat Overlay can instead derive an estimation of foliage from the trees data. This is done by effectively buffering the tree polygon with a certain amount of meters. That amount is determined by the FOLIAGE_CROWN_FACTOR, which is the ratio of foliage radius to tree height. This allows for a spatial dataset of foliage to be estimated based on the presence of trees.
For more information about how trees relate to the Heat Overlay, consult the documentation:
Preparation
For the purpose of this tutorial, 2 datasets are needed, which can be obtained from the Public Share as is. The Heat Overlay will also need to have one of its settings changed, both so that there is a baseline from which a change can be seen after the process completes, but also to correctly connect the Heat Overlay with the intended datasource.
Obtaining trees and foliage data
Go to:
This provides access to the Public Share.
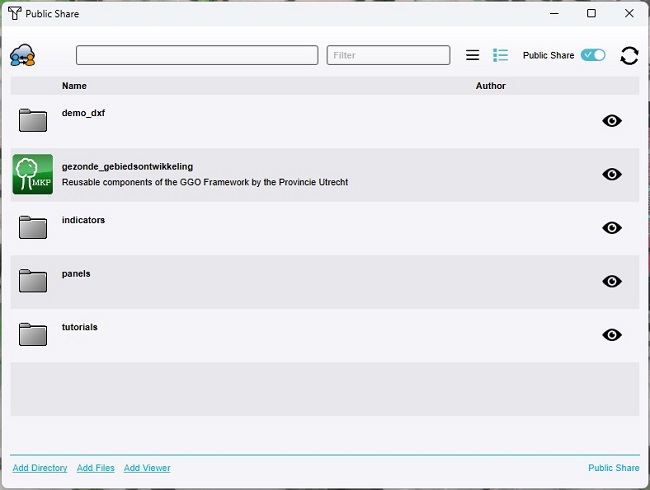
Navigate to the following directory: tutorials/tutorial_trees_and_foliage/
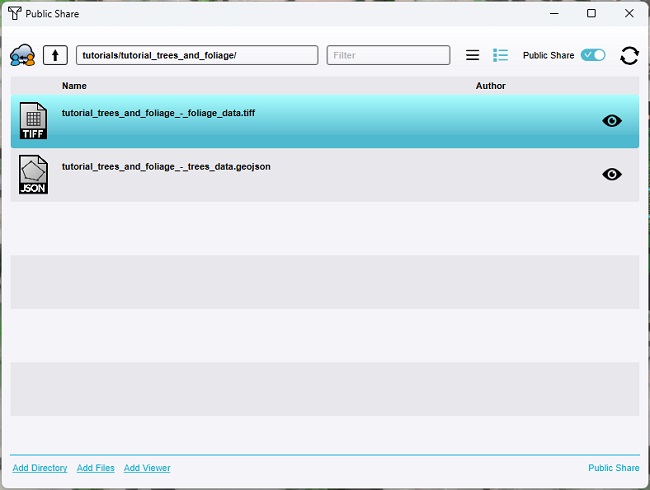
The "trees data" GeoJSON file contains a vector dataset with some tree data of the environment of the Demo Heat Stress Project.
The "foliage data" GeoTIFF file contains a grid dataset with information about foliage heights in and around the Demo Heat Stress Project.
For all files, select them by clicking on them, and then access them by clicking on "Web Link". This will open the file in the web browser, and prompt a download.
Resetting foliage source of the Heat Overlay
Finally, it is necessary to ensure the Heat Overlay now operates from a basis where it does not have any foliage information, so that the results of importing data can be verified.
Go to:
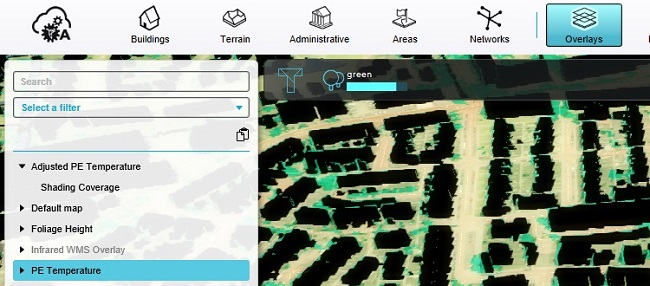
In the right panel, click on "Configuration Wizard". This opens the Heat Overlay Wizard.

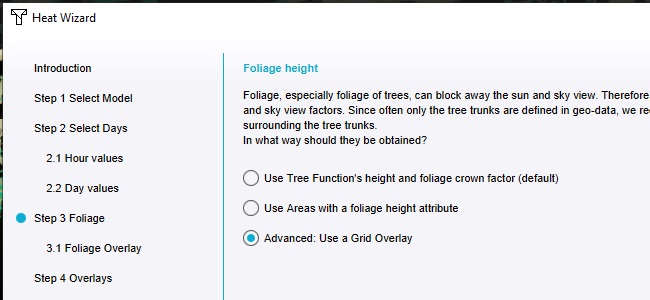
Continue to the step regarding Foliage.
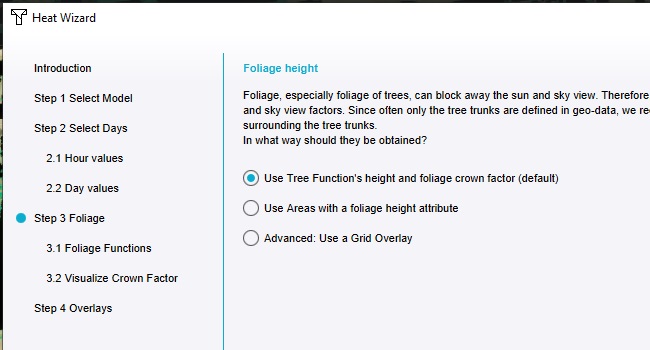
Opt to use "Tree Functions" height and foliage crown factor.
Close the Configuration Wizard.
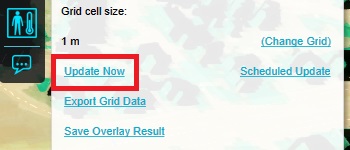
Click on "Update now" in the right panel to force the Overlay to recalculate.
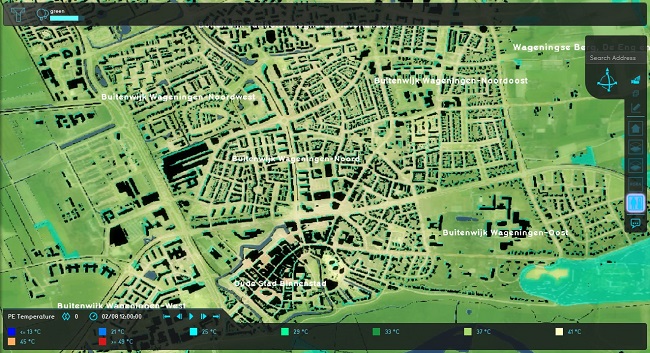
Notice the results for the Project have changed. This is because the calculation now relies on a different dataset.
Using trees data
An accurate dataset of trees will allow for an accurate counting of surface area used for the purposes of urban green. It can also be used by models such as the Heat Overlay to extrapolate foliage from, which affects the calculations for heat stress.
Removing existing trees from the Project
Before new trees data can be imported, the existing trees data should be removed. Otherwise, the original data may persist together with the new to-be-imported data, and throw off the results of calculations relying on the trees.
Go to:
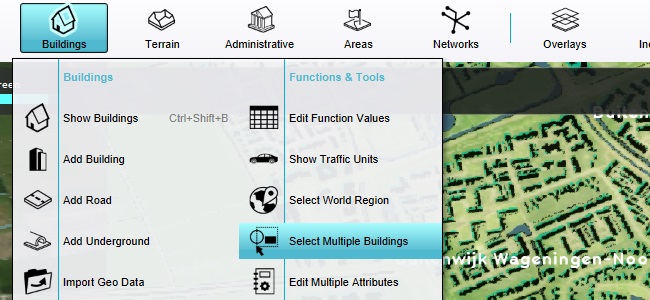
In the bottom panel, an interface now allows for the mass-manipulation of multiple Buildings at the same time, based on Function and extent.

As category, select "Specific Function".
As Function, select "Default Decidiuous Trees". This is the default type of trees and means this operation will only affect trees.
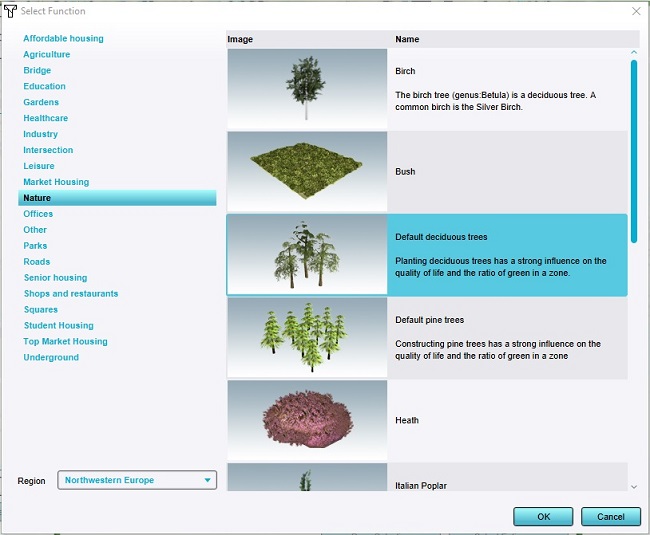
As action, select "REMOVE"

Click on "Entire Map"

A prompt will appear. Confirming it will delete the 160 or so trees from the Project, leaving it without any trees data.

Click on "Update now" in the right panel to force the Overlay to recalculate.

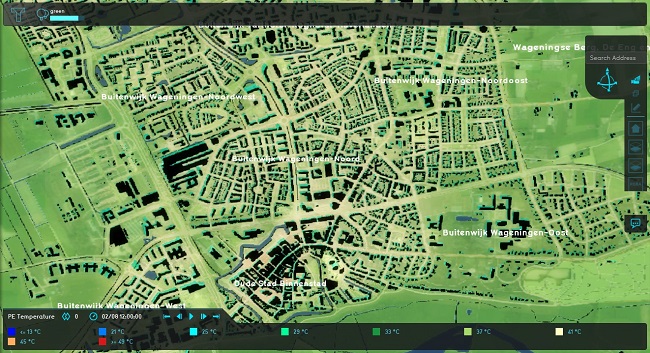
Notice the results for the entire Project are now significantly hot. This is because there is now no foliage data for the Heat Overlay to work with.
Importing trees data
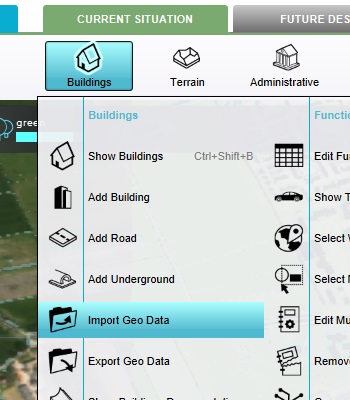
Go to:
This opens the Geo Data Wizard.
As import method, select "GeoJSON file".
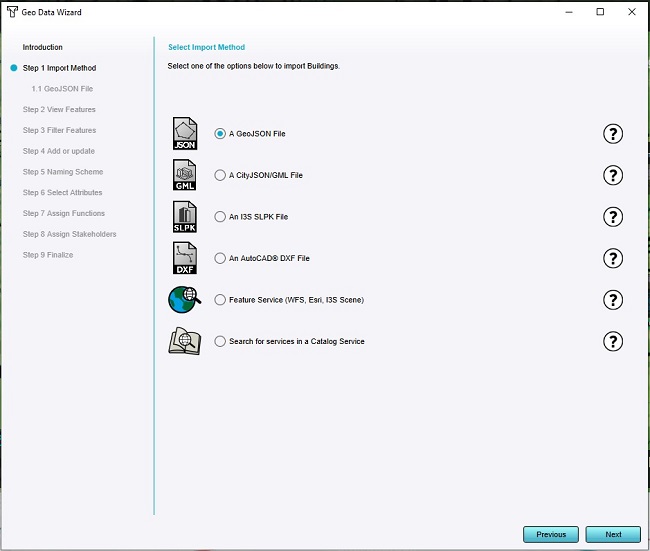
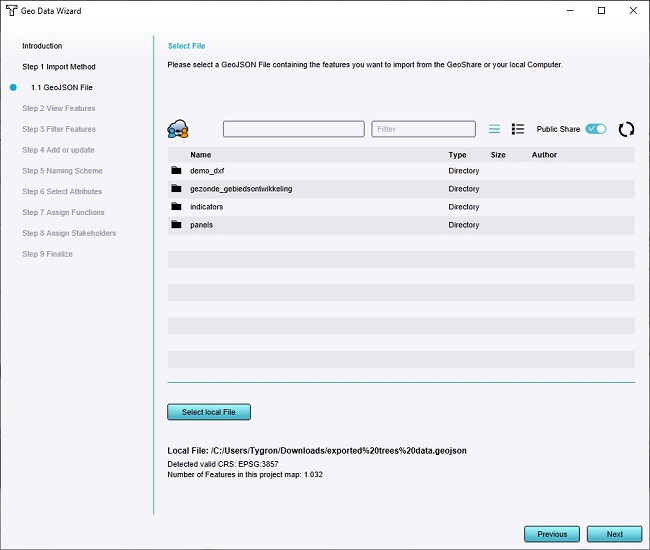
As GeoJSON file, click on "select local file". Select the previously downloaded trees geojson file.
Take note of the "View features" step, where the locations of all trees are shown.
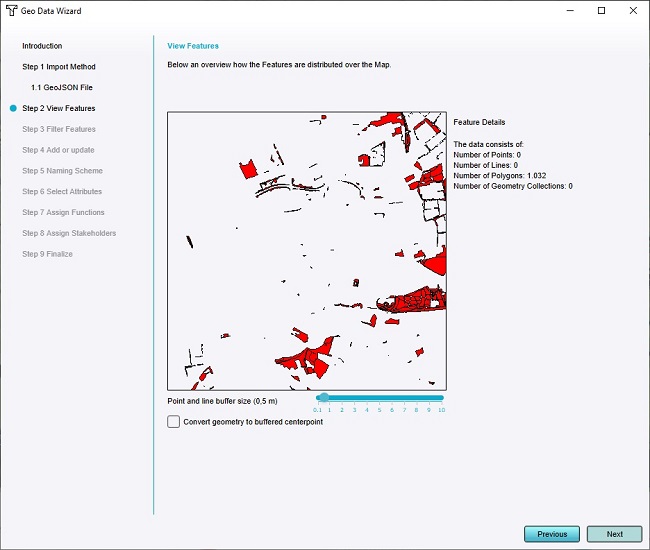
Also take note of the "buffer size" slider. when the dataset consists of points, all points will be buffered with the size indicated by the slider. By default all such points end up as polygons of exactly 1m² in size. Any polygons in the dataset will remain as-is.
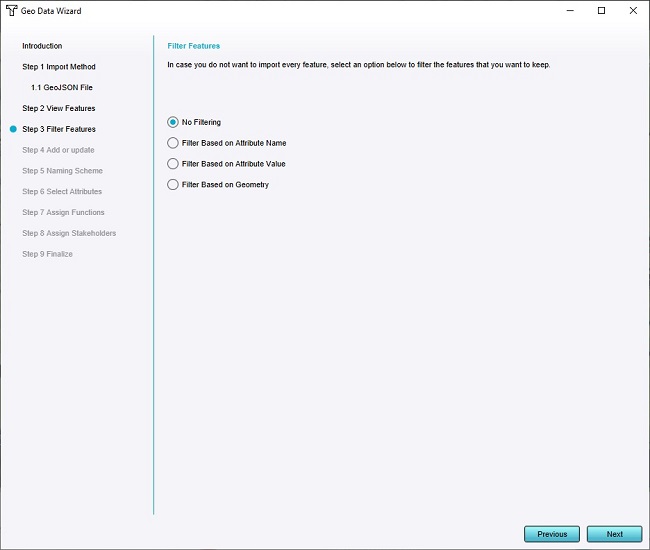
Skip through the step for filtering features (all features are desired), adding or updating features (the default is to add, which is what we nat to do), and the naming scheme (names are not relevant for calculations).
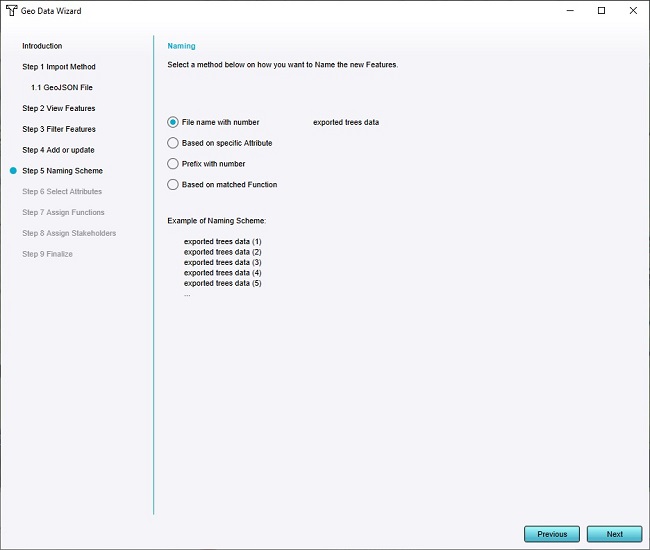
In the "Select Attributes" step, take note of the Attribute FLOOR_HEIGHT_M. This Attribute determines the height of the trees which are imported. If the dataset of trees has a different Attribute which indicates the tree height of features, find that Attribute in the list of [[Attribute] names, and then edit the name of the Attribute as it is imported using the text input fields in the middle of the screen.
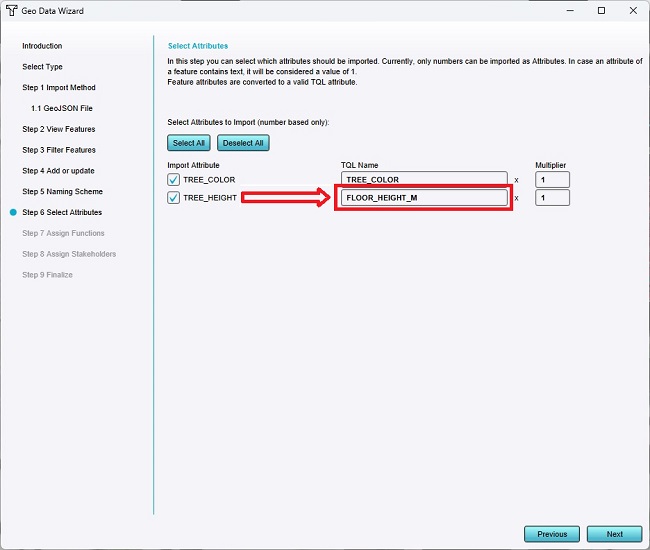
In the "Assign Functions" step, keep "One Function" selected, and click on "Select" to select the default function.
Select "Default Decidiuous Trees", and continue to the next step.
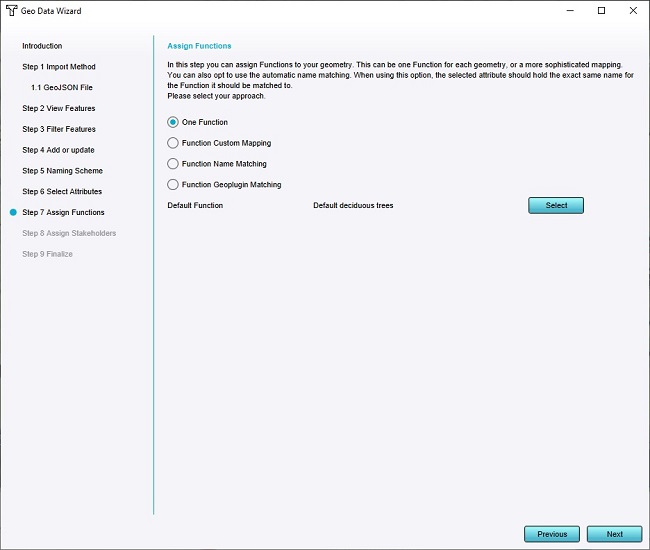
For the "Owner", select the Municipality.
Continue to the last step of the Wizard and click on "Finalize" to add the data to the Project.
Go to:
Click on "Update now" in the right panel to force the Overlay to recalculate.

Notice that in the areas where tree data was loaded in, the calculated temperature has dropped significantly.
Also inspect the "Foliage" child Overlay of the Heat Overlay, which shows the presence of foliage.
Using foliage grid data
Instead of relying on point data for trees, from which the Tygron Platform then extrapolates foliage coverage, it is also possible to supply a dataset of foliage directly. This is a grid of foliage heights which the Heat Overlay can then use for its calculations.
Importing foliage grid data
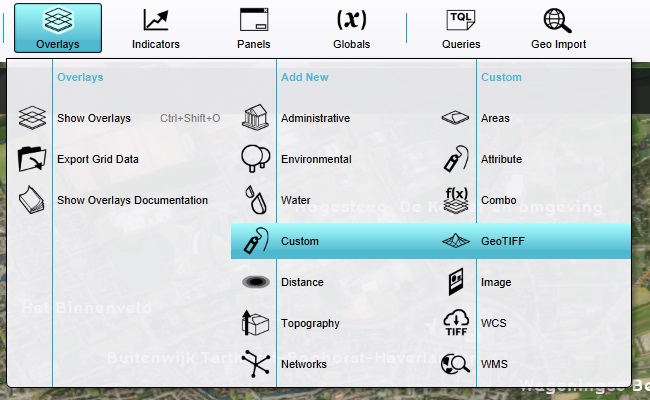
A GeoTiff Overlay is now added to the list of Overlays, and selected.
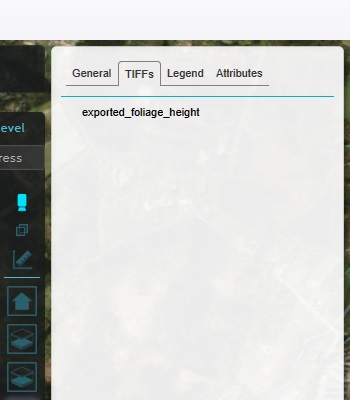
In the right panel, switch to the "TIFFs" tab.
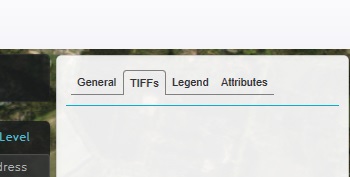
At the bottom of the right panel, click on "Add".

A window appears which can be used to manage GeoTiff assets in a Project.
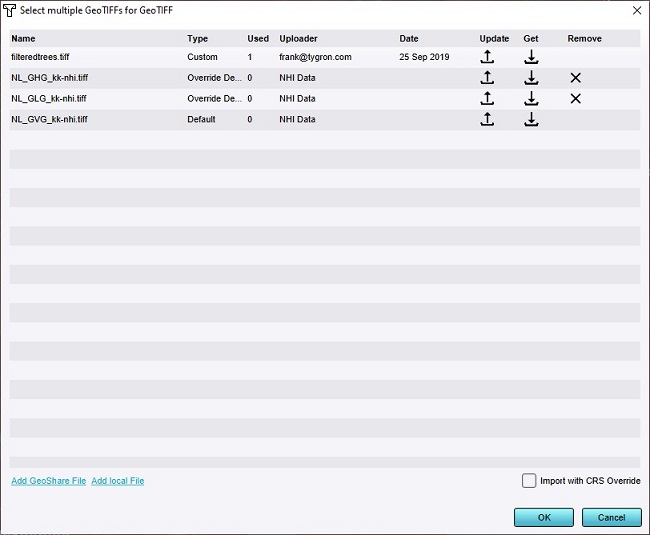
Click on "Add local file", and select the previously downloaded GeoTIFF file.

(Note that if the import of the file fails because you're working directly in the Demo Project, you can continue the rest of the steps with the already present "filteredtrees.tiff")
Select the imported tiff in the listing, and click "Ok".
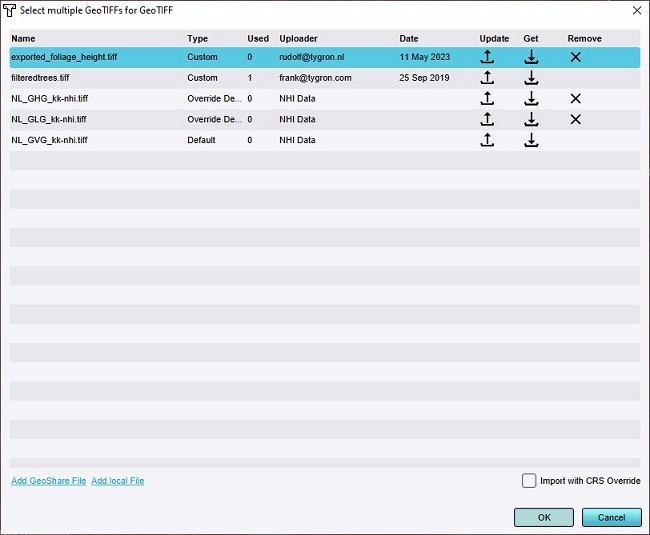
The tiff is now added to the listing.
Connecting foliage grid to Heat Overlay
Go to:
In the right panel, click on "Configuration Wizard". This opens the Heat Overlay Wizard.
Continue to the step regarding Foliage.

Opt to use a Grid Overlay to define the Foliage.

In the next step, select the newly added "GeoTIFF", which contains the foliage data.
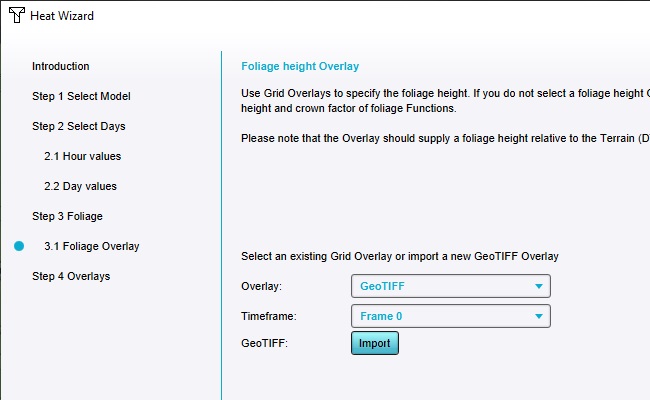
Close the Wizard, and click on "Update now" in the right panel.

Notice that in the areas with more foliage coverage according to the tiff, the calculated temperature has dropped significantly.

Also inspect the "Foliage" child Overlay of the Heat Overlay, which shows the presence of foliage.

Tutorial completed
Congratulations. You have now completed this tutorial. In it, you have learned how to import trees and foliage data, with an emphasis for use with the Heat Overlay.