How to add the Travel Distance Overlay: Difference between revisions
Jump to navigation
Jump to search
No edit summary |
No edit summary |
||
| Line 1: | Line 1: | ||
Below an example with the [[Travel_Distance_Overlay|Travel distance overlay]] based on a school and the travel distance for pedestrian traffic. | Below an example with the [[Travel_Distance_Overlay|Travel distance overlay]] based on a school and the travel distance for pedestrian traffic. | ||
We want to visualise which houses (and other buildings), within a range of 20m to a connecting sidewalk, are within a walking distance of 500m from a certain school. | |||
===Setting up the overlay=== | ===Setting up the overlay=== | ||
{| class="wikitable" | {| class="wikitable" | ||
|style="width: 5%"|1 | |style="width: 5%"|1 | ||
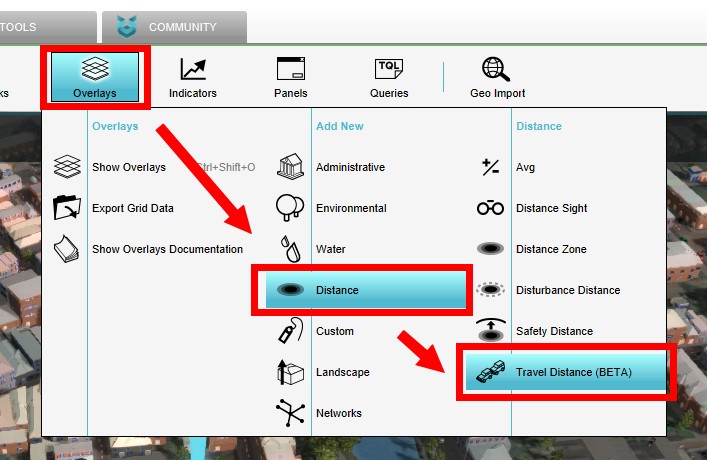
|style="width: 50%"|From the [[Current Situation]] tab, add a Travel Distance Overlay. [[Grid_Overlay#Grid_size|Adjust the grid]] as desired, 1 meter will give a nice resolution in our example. | |style="width: 50%"|From the [[Current Situation]] tab, add a Travel Distance Overlay from the category Distance. [[Grid_Overlay#Grid_size|Adjust the grid]] as desired, 1 meter will give a nice resolution in our example. | ||
|style="width: 10%"|[[File:Add_Travel_Distance_Overlay1.jpg|300px|center|thumb|]] | |style="width: 10%"|[[File:Add_Travel_Distance_Overlay1.jpg|300px|center|thumb|]] | ||
|- | |- | ||
|style="width: 5%"|2 | |style="width: 5%"|2 | ||
|style="width: 50%"| | |style="width: 50%"|Go to the Attributes tab of the Travel Distacen Overlay. The [[Fill_distance_(Travel_Distance_Overlay)|Fill distance]] is set by default on 20m and the [[Travel_distance_(Travel_Distance_Overlay)|Travel distance]] on 500. Set the [[Route_cars_(Travel_Distance_Overlay)|Route cars]] on 0 to not inculde roads for car traffic. Set the [[Route_pedestrians_(Travel_Distance_Overlay)|Route pedestrians]] on 1 to include roads for pedestrian traffic in the calculation. | ||
|style="width: 10%"|[[File:Keys_Tab1.jpg|300px|center|thumb|]] | |style="width: 10%"|[[File:Keys_Tab1.jpg|300px|center|thumb|]] | ||
|- | |- | ||
|style="width: 5%"|3 | |style="width: 5%"|3 | ||
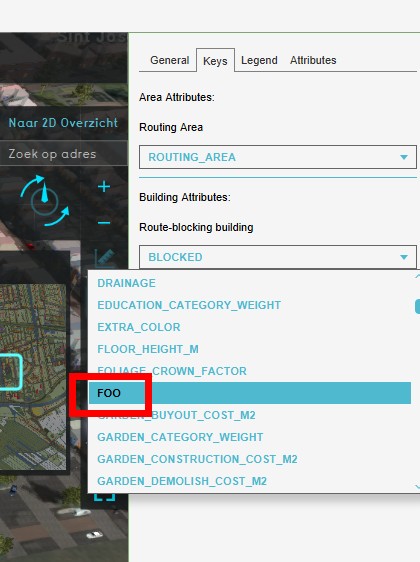
|style="width: 50%"|On the | |style="width: 50%"|On the Keys tab of the overlay, on the right side of the editor, the defaults [[Overlay_Key|keys]] [[Routing_area_(Travel_Distance_Overlay)|ROUTING_AREA]] and [[Blocked_(Travel_Distance_Overlay)|BLOCKED]] are already filled in. It is possible to change the key to another attribute (For example: 'FOO') can also be selected in the drop down menu for each of these keys. | ||
|style="width: 10%"|[[File:Keys_Tab1.jpg|300px|center|thumb|]] | |||
|- | |||
|style="width: 5%"|4 | |||
|style="width: 50%"|Draw an area over the school of which you want to calculate the travel distance from. [[How_to_add_an_Attribute|Add]] the corresponding key as an attribute to the area. In this example add the attribute ROUTING_AREA with a value of 1 to the area. | |||
|style="width: 10%"|[[File: | |style="width: 10%"|[[File:Travel_distance_step2.PNG|300px|center|thumb|]] | ||
|- | |||
|style="width: 5%"|3 | |||
|style="width: 50%"|[[Grid_Overlay#Grid_recalculation|Update]] the Travel Distance Overlay if [[Calculation_panel#Auto-update_indicators|Auto-update]] is off. | |||
|style="width: 10%"|[[File:Keys_Tab1.jpg|300px|center|thumb|]] | |||
|- | |||
|} | |} | ||
==See also== | ==See also== | ||
* [[Travel_Distance_Overlay|Travel distance overlay]] | * [[Travel_Distance_Overlay|Travel distance overlay]] | ||
Revision as of 14:33, 4 March 2021
Below an example with the Travel distance overlay based on a school and the travel distance for pedestrian traffic. We want to visualise which houses (and other buildings), within a range of 20m to a connecting sidewalk, are within a walking distance of 500m from a certain school.
Setting up the overlay
| 1 | From the Current Situation tab, add a Travel Distance Overlay from the category Distance. Adjust the grid as desired, 1 meter will give a nice resolution in our example. |  |
| 2 | Go to the Attributes tab of the Travel Distacen Overlay. The Fill distance is set by default on 20m and the Travel distance on 500. Set the Route cars on 0 to not inculde roads for car traffic. Set the Route pedestrians on 1 to include roads for pedestrian traffic in the calculation. |  |
| 3 | On the Keys tab of the overlay, on the right side of the editor, the defaults keys ROUTING_AREA and BLOCKED are already filled in. It is possible to change the key to another attribute (For example: 'FOO') can also be selected in the drop down menu for each of these keys. |  |
| 4 | Draw an area over the school of which you want to calculate the travel distance from. Add the corresponding key as an attribute to the area. In this example add the attribute ROUTING_AREA with a value of 1 to the area. |  |
| 3 | Update the Travel Distance Overlay if Auto-update is off. |  |