How to take a Screenshot: Difference between revisions
Jump to navigation
Jump to search
No edit summary |
No edit summary |
||
| Line 4: | Line 4: | ||
{{Editor steps|title=take a Screenshot | {{Editor steps|title=take a Screenshot | ||
| Select in the editor 'Tools' from the ribbon | | Select in the editor 'Tools' from the ribbon | ||
| | | Click on the 'Screenshot' button in the ribbon bar. | ||
| Select the | | In the newly opened panel, make sure Screenshot (png) is selected. | ||
| | | Optionally change the destination folder for newly taken screenshots. | ||
| Select whether you want to include the interface. | |||
| Select HD Overlay when taking a screenshot of an overlay and you want a higher resolution (less gritty) version. | |||
| Click on take screenshot to create an image. It will be shown in the left side of the panel. | |||
}} | }} | ||
<gallery> | <gallery> | ||
File:Tools_bar.jpg|200px|Select the Tools header in the Editor | File:Tools_bar.jpg|200px|Select the Tools header in the Editor | ||
File:Screenshot_bar. | File:Screenshot_bar.png|200px|Select the Screenshot ribbon bar | ||
File: | File:Take_screenshot_panel.png|200px|Select the 'Take a Screenshot Now' option | ||
</gallery> | </gallery> | ||
{{article end | {{article end | ||
Revision as of 14:47, 6 November 2023
This how-to described how you can make a screenshot of the 3D visualization without a visual interface.
How to take a Screenshot:
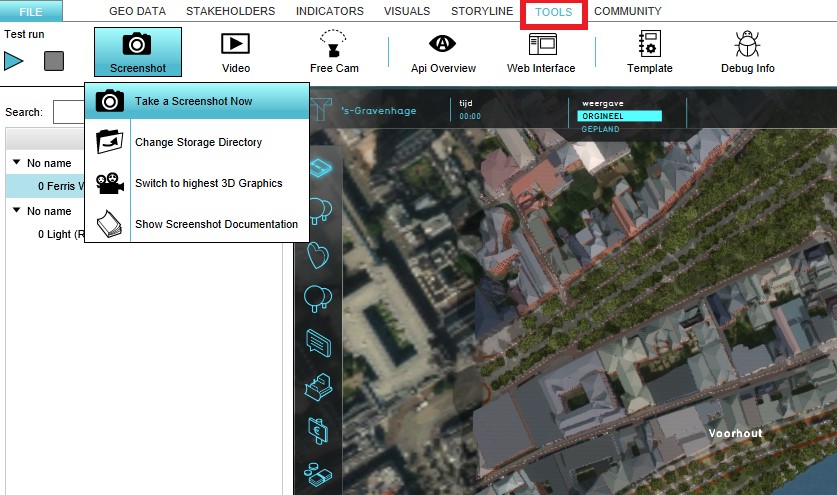
- Select in the editor 'Tools' from the ribbon
- Click on the 'Screenshot' button in the ribbon bar.
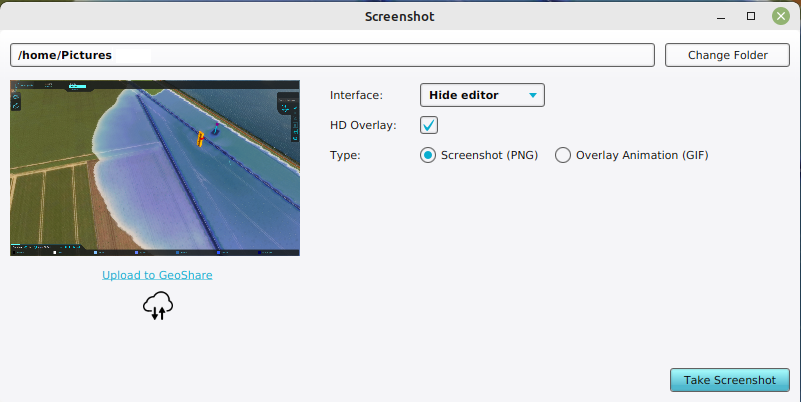
- In the newly opened panel, make sure Screenshot (png) is selected.
- Optionally change the destination folder for newly taken screenshots.
- Select whether you want to include the interface.
- Select HD Overlay when taking a screenshot of an overlay and you want a higher resolution (less gritty) version.
- Click on take screenshot to create an image. It will be shown in the left side of the panel.
-
Select the Tools header in the Editor
-
Select the Screenshot ribbon bar
-
Select the 'Take a Screenshot Now' option

