Scenario: Difference between revisions

From Tygron Support wiki
Jump to navigation Jump to search
No edit summary
 
(143 intermediate revisions by 7 users not shown)
Line 1: Line 1:
{{being updated}}
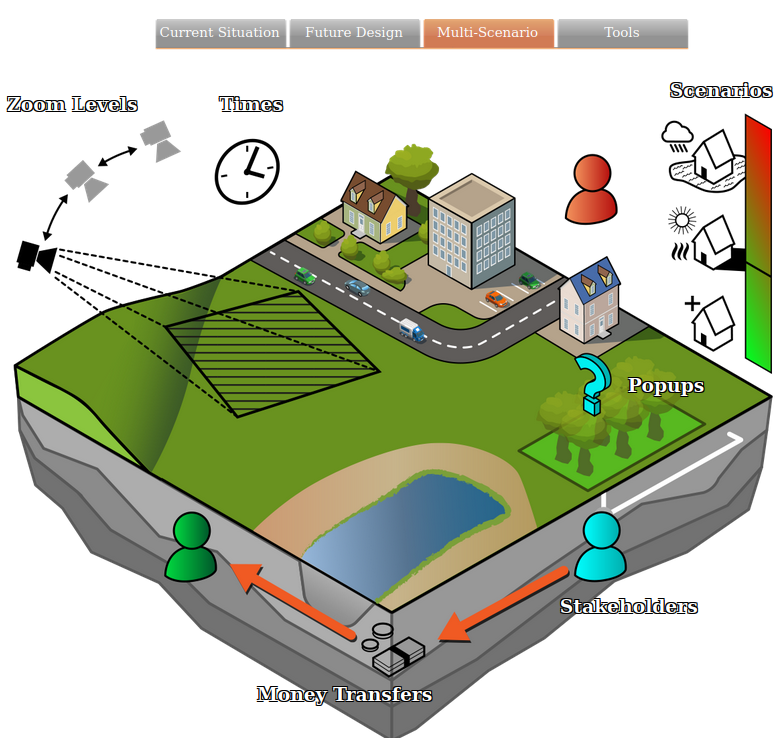
[[File:Api_multi_scenario.png|thumb|right|400px|[[Stakeholder]]s and [[Scenario]]s]]
{{learned|file=LevelsLogo-Q3-2015.jpg|what Levels are|how Levels relate to the Tygron engine|how to add Levels to your project|how to change Level properties in your project}}
By default, a project in the {{software}} always consists of at least one scenario.
==What are Levels?==
There are many definitions for the word Level, of which the following is the most relevant for the Tygron Engine:


: '''''A Level is a relative position or rank on a scale.'''''
When you have multiple Scenarios, for example with two different designs for you project, you can switch between them from the ribbon bar in the editor. Currently, only one scenario can be active at the same time. Actions taken in a different scenario are reverted.


==How do Levels relate to the Tygron Engine==
For different reasons it is possible to divide a project in two or more levels. Reasons to do so can be (but are not limited to):
* '''to provide the session participants a learning curve, to get used to interacting with the Tygron Engine'''
:''Create a first level as tutorial where a [[stakeholder]] can only perform a limited number of [[actions]] and [[measures]]. This can happen in a secluded area of the [[3D World]], to get acquainted with the interaction with the Tygron Engine, without affecting the outcome of the session as a whole.''
* '''to gradually make the project interaction more complex, to match the issue in real life more closely'''
:''Add more complex actions, measures and [[indicators]] to let session participants gradually experience the complexity of the spatial planning issue(s) at hand.''
* '''to jump in time to a future scenario'''
:''Each level can start with an [[event bundle|event]] or measure that reflects future scenarios, such as [[Terrains#Flooding terrain|floodings]] that only occur once every fifty and every one hundred years, or the sea level rising over time.''
* '''to provide pause moments during a session'''
:''Sessions often take place during business hours, taking up a whole morning, afternoon or even the whole day. By implementing levels the session flow can be interrupted to incorporate [[pause moments]] for reflection and refreshments.''


By default, a project in the Tygron Engine always consists of at least one level.
{{article end
|notes=
* Scenarios are intended to become parallel planned situations
* Scenarios replaced the incremental ''Level'' system.
|howtos=
* [[How to add or remove a Scenario]]
* [[How to change properties of a Scenario]]
* [[How to change Events fired by a Scenario]]
* [[How to change Measures activated by a Scenario]]
* [[How to configure the available actions of a stakeholder per scenario]]
* [[How to configure an intro Cinematic for a Stakeholder and a Scenario]]
|videos=
  {{video|link=https://www.youtube.com/watch?v=2eAsisgZNuo&list=PLqkv7u9AhhfwrmXQSwDkEvBbzfK900yg3&index=10|language=dutch|description=Webinar {{software}} LTS release 2023: working with scenario's.}}
}}


==Adding, duplicating and removing Levels in a project==
{{Editor multi scenario nav}}
{{Editor ribbon|header=Storyline|bar=Levels|dropdown=Add new Level}}
[[Category:Items]]
===Adding a Level===
[[File:LevelsAddNewLevel-Q3-2015.jpg|thumb|left|Add new level - drop down menu]]
[[File:LevelsAddLevel-Q3-2015.jpg|frame|right|Add new level - left panel]]
A level can be added in two ways in the Tygron Engine; through a ribbon drop down option or by selecting the Add button on the bottom of the left panel, after selecting Levels in the ribbon bar.
{{Editor steps|title=add levels to a project|Select Storyline → Levels|Select Add new Level from the drop down menu|Or select Add on the bottom of the left panel}}
<br clear=all>
===Duplicating a Level===
[[File:LevelsSelectLevel-Q3-2015.jpg|thumb|left|Select level to duplicate on left panel]]
[[File:LevelsDuplicateLevel-Q3-2015.jpg|frame|right|Duplicate selected level]]
When levels are used to add complexity or to provide a tutorial, it can be very convenient to be able to duplicate a previous level. This avoids having to create and assign all previous actions, measures and indicators again for each consecutive level. Instead, only the added complexity needs to be put in the duplicated level.
{{Editor steps|title=duplicate levels in a project|Select Storyline &#8594; Levels|Select the level to be duplicated on the left panel|Select Duplicate on the bottom of the left panel}}
<br clear=all>
 
===Removing a Level from a project===
[[File:LevelsSelectLevel-Q3-2015.jpg|thumb|left|Select level to remove on left panel]]
[[File:LevelsRemoveLevel-Q3-2015.jpg|frame|right|Remove selected level]]
Sometimes an earlier implemented level becomes redundant, or an error has occurred that renders a level useless. In such cases it is possible to remove the level completely.
{{Editor steps|title=remove levels in a project|Select Storyline &#8594; Levels|Select the level to be removed on the left panel|Select Remove on the bottom of the left panel}}
<br clear=all>
 
==Changing the properties of a Level==
{{Editor ribbon|header=Storyline|bar=Levels}}
[[File:LevelsLeftpanel-Q3-2015.jpg|100px|left|Levels Left Panel]]
===Level===
By selecting a level entry on the left panel, the following properties become available on the right panel:
====Name====
[[File:LevelsName-Q3-2015.jpg|frame|right|Enter the level name here]]
In the Name field a more suitable name can be entered, if desired. Examples of this are: "Tutorial", "Prologue", etc.
<br clear=right>
====Description====
[[File:LevelsDescription-Q3-2015.jpg|frame|right|Describe the level]]
The description field allows for describing the level in the Editor. This is convenient when the level has added complexity. The description will also appear on the Level panel of the [[Admin Interface]], providing a short summary of the levels in the project.
<br clear=right>
===Event Bundles===
 
[[File:LevelsEventBundles-Q3-2015.jpg|frame|right|Add events to a level]]
: ''Main article: [[Events]]''
By selecting the Even Bundles option of a level, it is possible to add events to a level; send automatically a message to a stakeholder, make more action menus available, etc. These events will be triggered as soon as the new level starts.
====Server Events fired when chosen====
On the right panel it is possible to assign the actual events to be triggered by the level. Add the event with the 'Add Event' button on the bottom of the right panel, and assign the desired event from the bottom panel with the 'Commit' button. This selection can also be cancelled.
<br clear=right>
===Measures===
: ''Main article: [[Measures]]''
[[File:LevelsMeasures-Q3-2015.jpg|frame|right|Assign measures]]
Besides events it is also possible to assign predefined measures to the start of a new level. For example; in the first level the stakeholders looked into different spatial alignments of possible solutions, in the second level, one alignment is constructed at the start of the level as automated measure, to accommodate further discussions. Prerequisite for this is to have the measure(s) available, then select the Measures entry on the left panel. The available measures will then show up on the right panel, which can then be assigned to the selected level.
<br clear=right>
===Stakeholders===
[[File:LevelsStakeholderProperties-Q3-2015.jpg|frame|right|Stakeholder properties (right panel)]]
Selecting the arrow next to 'Stakeholders' on the left panel opens up the stakeholder section, containing the names of all active stakeholders in the project. Here the stakeholder properties can be set up per level. The following properties can be adjusted:
====Provided Budget====
The Provided Budget is the budget increment that happens at the start of the level. This can be the fixed income per stakeholder per period, or a dedicated subsidy flow for a special cause for example. This increment is separate from any income generated during the level from stakeholder actions.
<br>
====Start with Cinematic====
it can be very convenient to introduce the new level with a cinematic. Each stakeholder can have a tailor made cinematic triggered at the start of each level, to inform about the intricacies of the new level. These cinematics must be created first, before they are available for selection from the drop down menu.
====Active Action Menus====
It is possible to assign more (or even different) action menus for each consecutive level, for each stakeholder. This is very useful when levels are implemented to build up complexity over the course of a session. Available action menus are present in a list with check boxes. Checking a box adds the action menu to the selected stakeholder for that level.
<br clear=right>
===Playable Zones===
[[File:LevelsPlayableZones-Q3-2015.jpg|frame|right|Select which zones are active]]
This section allows for assigning dedicated areas in the 3D world to the selected level. Any non selected area is not playable, which means that any action here here will not be deployable; the brush selection will color red.
<br clear=right>

Latest revision as of 12:01, 21 February 2023

By default, a project in the Tygron Platform always consists of at least one scenario.

When you have multiple Scenarios, for example with two different designs for you project, you can switch between them from the ribbon bar in the editor. Currently, only one scenario can be active at the same time. Actions taken in a different scenario are reverted.


Notes

  • Scenarios are intended to become parallel planned situations
  • Scenarios replaced the incremental Level system.

How-to's

Videos

Webinar Tygron Platform LTS release 2023: working with scenario's. (In dutch)