Water Module getting started: Difference between revisions

From Tygron Support wiki
Jump to navigation Jump to search
 
(102 intermediate revisions by 8 users not shown)
Line 1: Line 1:
[[File:Flooding_overview.png|300px|right]]
{{Water Module buttons}}
Getting started with the [[Water Module|water module]] in the {{software}} can seem to be a difficult process. By following a few basic steps and completing the [[Wizard|wizard]] belonging to the selected [[Water Overlay|water overlay(s)]], completing this process will be much easier.


To use the water module and its calculations in the [[3D World|three dimensional world]] of the {{software}}, a couple of [[Overlay|overlays]] are available. These overlays use the water module to calculate and simulate the water model in the project area. Results will be visualized as a two dimensional layer imposed over the 3D world.
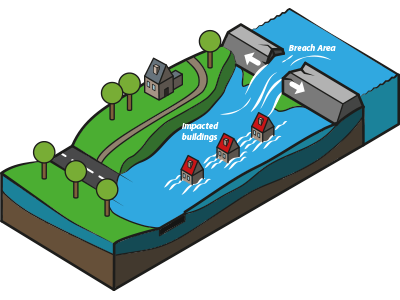
[[File:Flooding_overview.png|300px|middle]]


It is possible to map the results of a simulation over time, by using the [[Timeframes model attribute (Water Overlay)|timeframes]] function. This will enable the overlay to "play" the simulation over time, independent of the session time settings.
There are several approaches for getting started with the [[Water_Module|Water Module]], which are listed below.
<br clear=all>
==Preparing the project==
To be able to use the water module, a valid project needs to be loaded in the editor of the {{software}}.<br>
#<code>Start the {{software}} client.</code><br>
#<code>Create or load a project at the required location.</code><br>
<gallery>
File:LogIn1.png|thumb|200px|Start the client and log in
File:CreateOrLoadProject1.png|200px|Load or create a project in the [[Editor]]
File:ProjectInEditor1.png|200px|Project is loaded and ready in the Editor
</gallery>


==Selecting the overlay==
=== Tutorials ===
When the project is loaded in to the editor, we are ready to start using the water module. To do so, we need to select the water overlay that best suits the needs of our project.
* If you want to start by practising with the basics of the Water Module in a real situation, follow the [[Rainfall_Overlay_tutorial|Rainfall Overlay Tutorial]]
<gallery>
* If you want to start by practising with the basics of the Water Module in a theoretical setting, follow the [[Testbed_tutorial|Testbed Tutorial]].
File:SelectCurrentSituation1.jpg|1. Select 'Current Situation'
File:SelectOverlay2.jpg|2. Select Overlays
File:SelectWaterOverlayPopUp1.jpg|3. Select desired Water Overlay from pop up menu
</gallery>
The table below shows all available water overlays and a short description of these overlays.
{| class="wikitable"
||[[File:Overlay_rainfall.png]]
|[[Rainfall_(Overlay)|Rainfall Overlay]]
|provides insight into the water stress and impact caused by (excessive) rainfall
|-
||[[File:Overlay_flooding.png]]
|[[Flooding_(Overlay)|Flooding Overlay]]
|provides insight into water stress and impact caused by breaches in levees or other sources causing excessive water inflow
|-
||[[File:Overlay_groundwater.png]]
|[[Groundwater_(Overlay)|Groundwater Overlay]]
|provides insight into long-term processes of water flow both on the surface and underground
|}


When the overlay is added, the water module will immediately calculate the results. Based on the size of the project area and the size of the [[Grid overlay|grid cell]], this can take a while. The results of this initial calculation are based on default settings of the overlay, which are often not that accurate.
=== Testbeds ===
<gallery>
* If you would like to get familiar with the different components of the Water Module first, check out the [[Testbed_water_module|Water Module Testbed]]. This Testbed is available to you as a project in the {{software}}.
File:Rainfall-Overlay.jpg|thumb|right|200px|Rainfall overlay
File:FloodingOverlay2.png|right|thumb|200px|Flooding overlay
File:GroundwaterOverlay2.png|right|thumb|200px|Groundwater overlay
</gallery>
==Water Module Results==
There are four main methods to view the results from a water overlay:
===The actual 2D overlay with mini map===
[[File:PlaceholderImg1.png|thumb|Placeholder]]
===A running simulation of the overlay===
===A hover over panel with relevant information for a speciffic point in the 3D world===
===Results from the measurement tool, where change over time for a point or distance between points is given===


==Configuring the overlay==
=== How-to's and instructions for specific configurations ===
[[File:GridOverlayRightSidePanel1.png|right|thumb|left|Grid overlay right side panel]]
More examples of specific configurations of the water overlays are found on our [[How_to_configure_the_Water_Overlays| 'Configurations']] Page
To make the overlay calculations more accurate and better suitable for the actual situation at hand, some configurations can be made to the overlay. Some are directly accesible from the editor, but most configurations can be done in the dedicated wizards.
===Grid cell size===
[[File:GridCellWarning1.png|left|thumb|Grid cell warning]]<br clear=left>
When a grid based overlay is added to a project, the default size of 10m x 10m is usually not acurate enough. This will be indicated by a (yellow flashing) warning on the right side panel when the overlay is selected. This grid size can be adjusted by selecting the "Change grid" option on the right side panel. Selecting this option opens a new panel. When adjusting the grid size, please note that the smaller the grid size, the longer the calculations will take. If the new grid size is set to 5m x 5m, the amount of cells quadruples. A grid of 4 cells will now contain 16 cells!
<gallery>
File:AdjustGridSizePanel1.png|thumb|Adjust Grid size panel
File:GridSize1.png|thumb|Changing grid size from 10x10m to 5x5m
</gallery><br>


===Result type===
====Water Overlays====
[[File:ResultTypeDropDownMenu1.jpg|thumb|200px|left|Result type drop down menu]]
*[[Basic_water_model_use_case_(Water_Overlay)|How to configure a Water Overlay]]
From the right side panel it is also possible to select which [[Result type (Water Overlay)|result type]] is used for the overlay. Only one result type per overlay can be selected, however, in the wizard it is possible to select multiple result types as child overlays, to complement the main result type selected here.
* [[How to add a timeframe for initial conditions of a simulation (Water Overlay)]]
* [[How to configure two overlays with different settings for hydraulic structures and hydrological features]]


Result types such as [[Waterstress result type (Water Overlay)|WATER_STRESS]] or [[Surface last value result type (Water Overlay)|SURFACE_LAST_VALUE]] are good choices to begin with here.<br clear=left>
====Buildings====
*[[How to add and configure hydraulic structures (Water Overlay)]]


<!--===Calculation preference===
====Breach====
This option is a choice between fast but less accurate calculations ("Speed"), accurate but slow calculations ("Accuracy") or an average ("Avg") setting in between "Speed" and "Accuracy" settings.
*[[How to add a breach with external area manually]]
[[File:SetCalculationPrefs1.jpg|thumb|left|Set calculation preferences]]<br clear=left>-->
*[[How to add a breach with input area manually]]
===Overlay wizards===
*[[How to import a breach with input area]]
For each of the above mentioned water overlays, a dedicated [[Water Overlay Wizard|water overlay wizard]] is available for further configuration of the overlay. These wizards will take a user step by step through this configuration proces. In the table below are direct links to more infomation about these wizards.
*[[How to set dynamic breach height]]
{| class="wikitable"
*[[How to visualize multiple sequential breaches (Water Overlay)]]
!colspan="6"|Water Overlay Wizards
* [[How to simulate water overflowing river barrier]]
|-
||[[File:Overlay_rainfall.png]]
|[[Rainfall Overlay Wizard]]
||[[File:Overlay_flooding.png]]
|[[Flooding Overlay Wizard]]
||[[File:Overlay_groundwater.png]]
|[[Groundwater Overlay Wizard]]
|}


==How-to's==
====Sewers====
* [[How-to add and remove an overlay|Add and remove an overlay]]
*[[How to add sewer data (Water Overlay)]]
* [[How-to edit an overlay legend|Edit an overlay legend]]
*[[How to generate a sewer]]
*[[How to import sewers]]
*[[How to import sewer overflows]]


<br style="clear right">
====Evaporation====
<ul>
*[[How to load in dynamic evaporation rate (Water Overlay)]]
<li style="display: inline-block;">
*[[How to set linear evaporation rate (Water Overlay)]]
<div class="module-button">
====Rainfall====
<div class="module-button-text">[[Water_module_introduction|Introduction]]</div>
*[[How to set linear rain and simulation time (Water Overlay)]]
</div>
*[[How to load in dynamic rain and simulation time (Water Overlay)]]
</li>
*[[How to create a Rain area]]
<li style="display: inline-block;">
*[[How to add rain barrels to your project]]
<div class="module-button">
 
<div class="module-button-text">[[Water_module_overview|Overview]]</div>
====Surface====
</div>
*[[How to import a GeoJSON of waterways]]
</li>
*[[How to import a GeoTIFF of waterway depths]]
<li style="display: inline-block;">
*[[How to investigate increasing water levels in waterways]]
<div class="module-button">
 
<div class="module-button-text">[[Water_module_getting started|Getting started]]</div>
====Groundwater====
</div>
*[[How to upload and use a groundwater GeoTIFF (Water Overlay)]]
</li>
*[[How to use a default groundwater GeoTIFF (Water Overlay)]]
<li style="display: inline-block;">
*[[How to generate an initialized groundwater situation]]
<div class="module-button">
 
<div class="module-button-text">[[Water_module_configuration|Configuration]]</div>
{{article end
</div>
|seealso=* [[Getting started]]
</li>
}}
<li style="display: inline-block;">
{{Water Module buttons}}
<div class="module-button">
<div class="module-button-text">[[Water_module_use_cases|Use cases]]</div>
</div>
</li>
<li style="display: inline-block;">
<div class="module-button">
<div class="module-button-text">[[Water_module_theory|Theory]]</div>
</div>
</li>
<li style="display: inline-block;">
<div class="module-button">
<div class="module-button-text">[[Water_module_benchmarks|Benchmarks]]</div>
</div>
</li>
<li style="display: inline-block;">
<div class="module-button">
<div class="module-button-text">[[Water_module_tips_and_tricks|Tips and tricks]]</div>
</div>
</li>
</ul>

Latest revision as of 16:50, 30 January 2024


Flooding overview.png

There are several approaches for getting started with the Water Module, which are listed below.

Tutorials

  • If you want to start by practising with the basics of the Water Module in a real situation, follow the Rainfall Overlay Tutorial
  • If you want to start by practising with the basics of the Water Module in a theoretical setting, follow the Testbed Tutorial.

Testbeds

  • If you would like to get familiar with the different components of the Water Module first, check out the Water Module Testbed. This Testbed is available to you as a project in the Tygron Platform.

How-to's and instructions for specific configurations

More examples of specific configurations of the water overlays are found on our 'Configurations' Page

Water Overlays

Buildings

Breach

Sewers

Evaporation

Rainfall

Surface

Groundwater

See also