Navigation panel: Difference between revisions
No edit summary |
|||
| Line 27: | Line 27: | ||
The navigation panel also contains a list of Overlays available to the [[Stakeholder]]. Clicking on a button visualizes the [[Overlay]] in the [[3D Visualization]]. Hovering over the overlay button also shows a minimap of the [[project area]] with the overlay projected on top of it. | The navigation panel also contains a list of Overlays available to the [[Stakeholder]]. Clicking on a button visualizes the [[Overlay]] in the [[3D Visualization]]. Hovering over the overlay button also shows a minimap of the [[project area]] with the overlay projected on top of it. | ||
If the [[Overlay]] is also a [[Parent Overlay]], the [[Child Overlay]]s will be shown as buttons below the minimap next to the Parent Overlay button. Clicking on these buttons will activate the respective child or parent Overlay. When an Overlay is activated, the [[ | If the [[Overlay]] is also a [[Parent Overlay]], the [[Child Overlay]]s will be shown as buttons below the minimap next to the Parent Overlay button. Clicking on these buttons will activate the respective child or parent Overlay. When an Overlay is activated, the [[Overlay legend panel]] will also be visualized. | ||
====Action log==== | ====Action log==== | ||
Latest revision as of 10:44, 9 January 2024

The navigation panel is a panel on the right side of the Viewer interface. It provides access to:
- A building and address search bar, which can help to navigate.
- Camera controls
- Measuring tool
- Overlays
- Action Logs
Address search
Located at the top of the navigation panel is the address search bar. This search bar can be used to quickly navigate to a precise address in the project area. Once one of the provided results is selected, the Camera will fly to the location of the address.
- Click the address search bar
- Type in an address
- Autocomplete will try to complete the address
- Press the enter key to confirm
Camera Controls
The camera mode can be selected by clicking on the camera buttons.
Transparent heightmap
Click this option to make the heightmap semi transparent.
Overlay and mini map
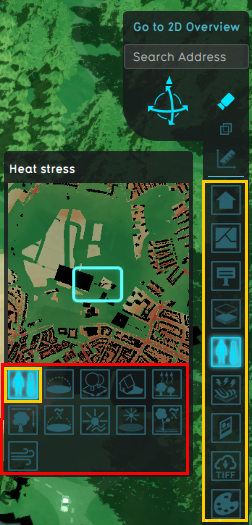
The navigation panel also contains a list of Overlays available to the Stakeholder. Clicking on a button visualizes the Overlay in the 3D Visualization. Hovering over the overlay button also shows a minimap of the project area with the overlay projected on top of it.
If the Overlay is also a Parent Overlay, the Child Overlays will be shown as buttons below the minimap next to the Parent Overlay button. Clicking on these buttons will activate the respective child or parent Overlay. When an Overlay is activated, the Overlay legend panel will also be visualized.
Action log
The Action log button is located in the navigation panel as the last button, below the buttons of overlays. Clicking on the Action log button opens the Action log panel.