Ribbon: Difference between revisions
No edit summary |
|||
| (26 intermediate revisions by 5 users not shown) | |||
| Line 1: | Line 1: | ||
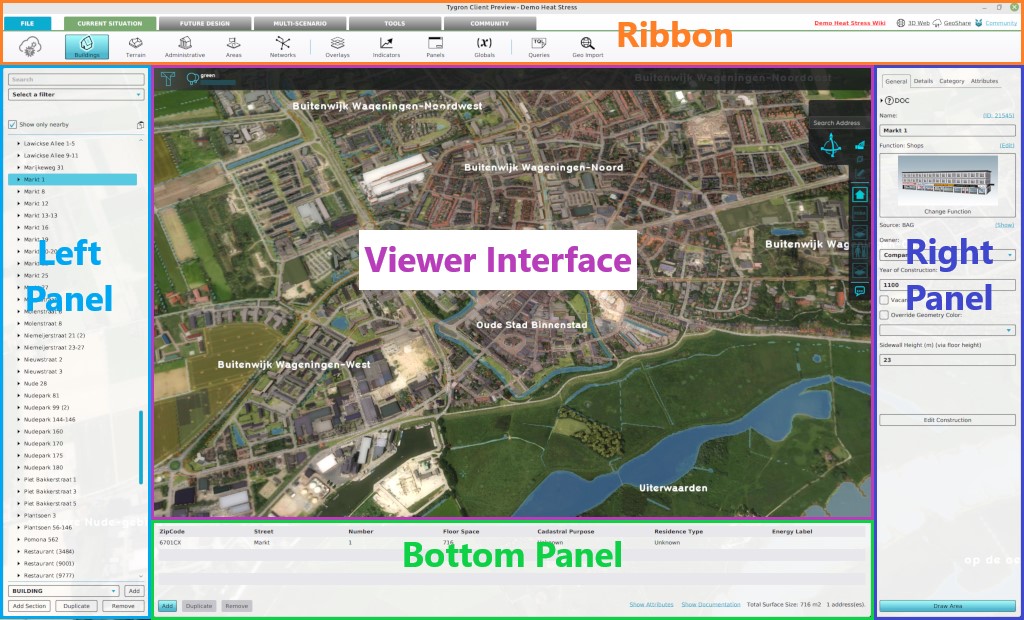
The ribbon is located in the top part of the editor. It is a tabbed header, which provides access to tools grouped by categories. Those categories are in organized in tabs. This makes tools accessible in a logical way. | The ribbon is located in the top part of the editor. It is a tabbed header, which provides access to tools grouped by categories. Those categories are in organized in tabs. This makes tools accessible in a logical way. | ||
[[File:Q1-2016-EditorPanel.jpg|thumb|400px|left|The editor. The Ribbon at the top of the screen, the Left Panel on the left side of the screen, the User Main Interface in the center of the screen, the Right Panel on the right side of the screen, and the Bottom Panel at the bottom of the screen.]] | [[File:Q1-2016-EditorPanel.jpg|thumb|400px|left|The editor. The Ribbon at the top of the screen, the Left Panel on the left side of the screen, the User Main Interface in the center of the screen, the Right Panel on the right side of the screen, and the Bottom Panel at the bottom of the screen.]] | ||
| Line 7: | Line 4: | ||
==Ribbon overview== | ==Ribbon overview== | ||
[[File:Editor_ribbon.jpg|850px|thumb|left|]]<br clear= | [[File:Editor_ribbon.jpg|850px|thumb|left|]]<br clear=left> | ||
The ribbon at the top consists of 2 parts, the ribbon header and the ribbon bar. | The ribbon at the top consists of 2 parts, the ribbon header and the ribbon bar. | ||
| Line 13: | Line 10: | ||
*[[Current Situation]] | *[[Current Situation]] | ||
*[[Future Design]] | *[[Future Design]] | ||
*[[Multi | *[[Multi Scenario]] | ||
*[[Tools]] | *[[Tools]] | ||
*[[Community]] | *[[Community]] | ||
Clicking on one of these five tabs reveals a menu on the ribbon bar corresponding to the selected tab. | Clicking on one of these five tabs reveals a menu on the ribbon bar corresponding to the selected tab. | ||
| Line 30: | Line 28: | ||
The [[Calculation panel]] helps you to manage the calculation time of your project. The Calculation Panel can be found by hovering with your mouse over the 'A' circle-arrow button. | The [[Calculation panel]] helps you to manage the calculation time of your project. The Calculation Panel can be found by hovering with your mouse over the 'A' circle-arrow button. | ||
[[File:Recalculate_panel.JPG|750px]] | [[File:Recalculate_panel.JPG|750px]] | ||
===File=== | ===File=== | ||
: ''Main article: [[File Menu|File menu]]. | : ''Main article: [[File Menu|File menu]]. | ||
[[File:Editor_file_ribbon_header.jpg|thumb|left|File Pane]] | [[File:Editor_file_ribbon_header.jpg|thumb|left|File Pane]] <br clear=all> | ||
Selecting the "File" Tab from the ribbon header opens the [[File Menu]].<br clear=all> | Selecting the "File" Tab from the ribbon header opens the [[File Menu]].<br clear=all> | ||
{{Template:Editor_ui_nav}} | |||
: | |||
Latest revision as of 08:55, 1 February 2024
The ribbon is located in the top part of the editor. It is a tabbed header, which provides access to tools grouped by categories. Those categories are in organized in tabs. This makes tools accessible in a logical way.

Ribbon overview

The ribbon at the top consists of 2 parts, the ribbon header and the ribbon bar.
The ribbon header provides access to the File Menu and five other tabs:
Clicking on one of these five tabs reveals a menu on the ribbon bar corresponding to the selected tab.
The tab that is currently active is colored, while the non-active tabs are grey.
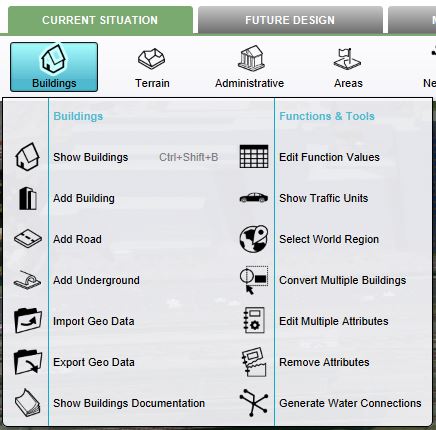
Ribbon bar dropdown menu

A dropdown menu can be presented when hovering buttons on the ribbon bar. The dropdown menu can be used as a shortcut to access the left panel, to add items to your project, or can redirect users to the documentation section.
Calculation Panel
The Calculation panel helps you to manage the calculation time of your project. The Calculation Panel can be found by hovering with your mouse over the 'A' circle-arrow button.

File
- Main article: File menu.

Selecting the "File" Tab from the ribbon header opens the File Menu.